
Using Ionic Stencil components in OutSystems Applications
Step-by-step instructions on developing a simple Stencil component for Amazon Location Service Maps for use in OutSystems.

Throughout my diverse career, I've accumulated a wealth of experience in various capacities, both technically and personally. The constant desire to create innovative software solutions led me to the world of Low-Code and the OutSystems platform. I remain captivated by how closely OutSystems aligns with traditional software development, offering a seamless experience devoid of limitations. While my managerial responsibilities primarily revolve around leading and inspiring my teams, my passion for solution development with OutSystems remains unwavering. My personal focus extends to integrating our solutions with leading technologies such as Amazon Web Services, Microsoft 365, Azure, and more. In 2023, I earned recognition as an OutSystems Most Valuable Professional, one of only 80 worldwide, and concurrently became an AWS Community Builder.
In 2022, OutSystems acquired Ionic, which is well-known for its cross-platform mobile UI toolkit, the Ionic Framework, and Capacitor, their cross-platform native runtime. So far, OutSystems and Ionic haven't shared much about their joint roadmap or how their product lines will enhance each other.
While it's not confirmed, it's quite likely that Capacitor will replace the current Cordova-based mobile applications in OutSystems. From my personal view, this change is much needed. It's not that Apache Cordova is completely obsolete, but its relevance has been declining, with downloads decreasing since 2020. This decline means that community support, especially for existing Cordova plugins, is almost non-existent.
On the other hand, Capacitor is actively developed by Ionic and a large community. It offers better tooling, improved performance, and since it's built on top of Cordova, it also provides some level of backward compatibility.
Regarding Capacitor, we need to wait for OutSystems and Ionic to come up with a solution. However, there is already one Ionic product that we can use immediately in OutSystems: Stencil.
Stencil is an open-source compiler that creates Web Components. Web Components are custom HTML elements (tags) that encapsulate behavior (methods and events) and content (HTML and CSS). This allows them to be used in web applications just like standard HTML tags. A key benefit of Web Components is their flexibility; they aren't limited to any specific frontend framework (like React or Vue) and can be integrated into various environments, including OutSystems Reactive Web Applications.
When exploring Web Components online, you'll often come across the term "Design System". Many renowned brands have developed their User Interface components into Web Component libraries, encapsulating their unique design and functionality. Examples include Adobe Spectrum, IBM Carbon, and Microsoft Fluent.
With Stencil, you gain access to a robust toolkit for creating your own Web Component or a complete Design System library. Stencil Web Components are developed using TypeScript and JSX Syntax, simplifying the complexity of the browser's Custom Elements API and adding extra features that make building and using your own component library very straightforward.
Why you should care about Stencil
You might be asking yourself why you should consider using Stencil with OutSystems. OutSystems already allows you to create highly reusable blocks, complete with styling and behavior.
Well, if you've ever needed to build a somewhat complex frontend library using external libraries and had to expose behavior (methods) outside of OutSystems blocks, then you may get an idea, why a comprehensive toolchain like Stencil can be beneficial.
What this article covers
In this article, we will create a simple Web Component for displaying and interacting with a map from Amazon Location Service and then use the Web Component in an OutSystems Reactive Web Application.
You can evaluate Amazon Location Service using the free-tier for up to three months of usage.
Prerequisites
Without further delay, let's begin with the prerequisites.:
Amazon Location Service
In your AWS account, go to the Amazon Location Service console.
Under the Manage Resources menu, select Maps, then click on Create Map.
Give your map resource a name and pick one of the available map styles.
Be sure to check Create an API key in the API key section and give the new key a name. You can leave the Referrer field blank for now, but later you should add your OutSystems environment DNS name to it.
Read the Terms and Conditions and tick the checkbox to show you agree with them.
Click on Create Map to finish creating your map resource.
In the Manage Resources menu, choose API keys.
Click on your newly created API key and then select Show API key value.
Copy the key value shown. We will use it later.
Development Environment
Not much is needed for developing Web Components with Stencil
Latest LTS version of nodejs
Any editor like Visual Studio Code or JetBrains WebStorm.
You can also create a free account at npm. While not required, it simplifies the process of publishing your developed Web Components library to unpkg.com, a global content delivery network that works directly with npm published packages. Alternatively, you can upload the generated distribution files to any publicly accessible web endpoint.
Developing the Amazon Location Service Map component
See my GitHub repository for the final code.
Stencil Package Setup
Start by running
npm init stencilin the command line to create a new Stencil package.Choose the component option and press Enter.
Name your project, for example, aws-location-service. This name will also be the name of the folder for your package.
Go to the new package's folder and run
npm installto install the necessary dependencies.Use
npm startto begin the build process and launch a development server at http://localhost:3333. Once the build completes, you'll see the default message from the sample web component in the package:Hello, World! I'm Stencil 'Don't call me a framework' JS.
Create a New Map Web Component
Instead of changing the sample Web Component that comes by default, let's make a new one.
Inside the project folder, execute
npm run generate.Name your new Web Component, for example, aws-map.
Turn off Spec Test and E2E Test options by pressing the Space bar.
This will create a new folder in the components directory containing two files: one with the TypeScript code for the Web Component and another with a CSS file for styling.
src\components\aws-map\aws-map.tsx
src\components\aws-map\aws-map.css
Open the aws-map.tsx file in your editor
import { Component, Host, h } from '@stencil/core';

@Component({
  tag: 'aws-map',
  styleUrl: 'aws-map.css',
  shadow: true,
})
export class AwsMap {

  render() {
    return (
      <Host>
        <slot></slot>
      </Host>
    );
  }

}
Take a look at the @Component decorator. It marks the AwsMap class as a Stencil component and gives extra settings for the build process that turns a Stencil component into a Web Component.
tag - The HTML tag name for the component,
<aws-map></aws-map>.styleUrl - The stylesheet link for this component.
shadow - Setting this to true means the component will use the native shadow-DOM for encapsulation.
Learn more about the @Component decorator and its settings in the Stencil documentation.
The render method uses two Stencil-specific HTML tags: <Host> and <slot>. For simplicity, think of the Host element as the outer container of the component, and Slot as a space to add extra tags (similar to children in React). You can find more details about the Host and Slot elements in the Stencil documentation.
Add MapLibre Dependency
To display a map in the browser, we need to add the MapLibre GL JS library. MapLibre GL is an open-source TypeScript library that uses WebGL to display interactive maps from vector tiles.
In your project directory, run npm install maplibre-gl to install this library.
Define properties
Next, we define some properties in our AwsMap class that our component needs to initialize a map. Properties correspond to HTML tag attributes.
ApiKey - The key we created when we set up the Amazon Location Service Map resource.
Region - The Amazon Web Services region system name where you created the map resource (e.g., eu-central-1).
MapName - The name of the Map resource.
Lat - The initial Latitude position on the map.
Lng - The initial Longitude position on the map.
Zoom - The initial zoom level of the map.
export class AwsMap {

  /** API generated in AWS Location Service Console **/
  @Prop() apiKey: string;
  /** Initial latitude position **/
  @Prop() lat: number;
  /** Initial longitude position **/
  @Prop() lng: number;
  /** Map name from AWS Location Service console **/
  @Prop() mapName: string;
  /** AWS Region **/
  @Prop() region: string;

  /** Zoom Level **/
  @Prop() zoom: number = 10;

...
}
From the DOM this properties can be used in the following way
<aws-map api-key="<key>" lat=<latitude> lng=<longitude> map-name="<Map Name>" region="<AWS Region>" zoom=<zoom level></aws-map>
Map Container
We need to add two more properties to our class. One will hold the map instance, and the other will keep a reference to the HTML element that shows the map.
Then, we need to update the render method.
currentMap: Map;            // Map Instance. Defined in maplibre-gl
mapElement!: HTMLElement;   // Map container

render() {
    return (
      <Host>
        <div class="map" ref={(el) => this.mapElement = el as HTMLElement} />
      </Host>
    );
  }
Initialize Map Instance
Stencil allows us to tap into various lifecycle events of a component. For our map component, we need to initialize the map just once. Therefore, we put the initialization code in the componentDidLoad lifecycle event. You can learn more about Stencil's component lifecycle events in the documentation.
Now, add the following two methods to your class:
initializeMap() {
    this.currentMap = new Map({
      container: this.mapElement,
      center: [ this.lng, this.lat ],
      zoom: this.zoom,
      style: `https://maps.geo.${this.region}.amazonaws.com/maps/v0/maps/${this.mapName}/style-descriptor?key=${this.apiKey}`,
    });
}

componentDidLoad() {
    this.initializeMap();
}
Watch Property Changes
So far, when one of our component properties changes, it doesn't affect the map. We're going to change this by monitoring changes to the zoom property and adjusting the map's zoom level accordingly. We can do this by adding a new method decorated with Watch.
Add the following code below the zoom property
  @Watch('zoom')
  watchZoom(newValue: number) {
    this.currentMap.setZoom(newValue);
  }
Whenever the zoom property changes, this method will update the map's zoom level to the new value. Learn more about the Watch decorator in the documentation.
Exposing a Method
Next, we will introduce a new method to our component that lets us add markers to our map. Add the following code:
@Method()
async addMarker(color: string, lng: number, lat: number) {
  const marker = new Marker({color: color}).setLngLat([lng, lat]);
  marker.addTo(this.currentMap);
}
The method addMarker requires a color (in HEX format), along with longitude and latitude coordinates as inputs. It then creates a new Marker object and finally adds this new marker to the map instance.
Methods need to be marked with the Method decorator and they must be asynchronous.
Styling the Map
The final modifications we need to make include adding the default styles from the maplibre module and then adding the map class styles to the component's stylesheet.
First modify the Component decorator to look like this
@Component({
  tag: 'aws-map',
  styleUrls: ['aws-map.css','../../../node_modules/maplibre-gl/dist/maplibre-gl.css'],
  shadow: false,
})
Instead of the original styleUrl that accepts only one stylesheet file, we're now using styleUrls which allows for an array of stylesheets. The first stylesheet, aws-map.css, is the component's own stylesheet, and the second is the stylesheet that comes with maplibre.
Next open the aws-map.css file and add the following class
.map {
  aspect-ratio: 21/9;
}
Run Component in Development Server
To test our component with the integrated development server, we first have to add our component to src\index.html. Modify the file, so that it looks like the following
<!DOCTYPE html>
<html dir="ltr" lang="en">
  <head>
    <meta charset="utf-8" />
    <meta name="viewport" content="width=device-width, initial-scale=1.0, minimum-scale=1.0, maximum-scale=5.0" />
    <title>Stencil Component Starter</title>

    <script type="module" src="/build/os-aws-location.esm.js"></script>
    <script nomodule src="/build/os-aws-location.js"></script>
  </head>
  <body>
    <h1>Amazon Location Service Map</h1><br/>
    <aws-map map-name="<AWS Map Name>" region="<AWS Region>" lat=38.71698662323127, lng=-9.238496679324449 zoom=12 api-key="<AWS API Key>"></aws-map>
  </body>
</html>
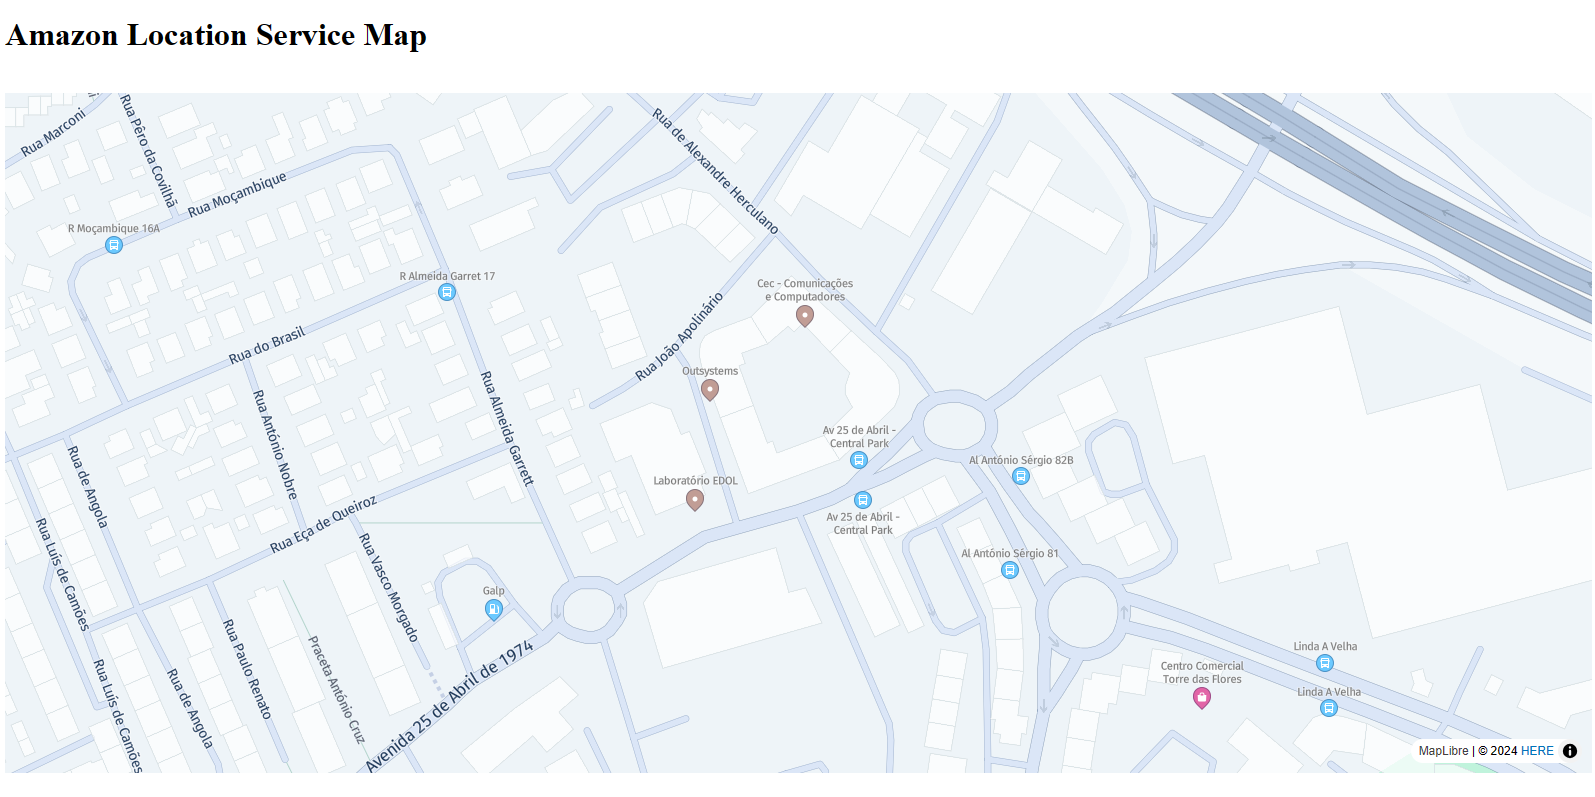
Ensure you replace the component properties with your own values. The given latitude and longitude coordinates point to the OutSystems Headquarters in Lisbon.
To launch the development server, execute npm start. Your page should now appear as follows:
Publish Component
To use our component library, which currently has only one component, in OutSystems, you need to publish the build to a CDN or any other publicly accessible web server.
To create a build, run npm run build. This will generate a production build in the dist folder of the project. You should then publish the contents of the dist folder on a CDN. To publish to your npm repositories, just run npm publish, log in to your account, and you're all set.
Using a Component Library in OutSystems Applications
The final part is to use the component library in an OutSystems application.
Create a new Reactive Web Application in Service Studio
Add a new Screen to the application, for example Demo
Create a Loader Client Action
Unfortunately, there is no built-in method to load the Stencil script directly. This includes using the RequireScript client action from the System module, so you will need to create your own loader action.
In the Logic tab crate a new Client Action and name it RegisterStencil
Drag a JavaScript element to the flow
Add the following code to the JavaScript element
const existing = document.getElementById('stencilloader');
if(!existing) {
    const stencilScript = document.createElement('script');
    stencilScript.setAttribute('src','https://unpkg.com/os-aws-location@0.0.1/dist/os-aws-location/os-aws-location.esm.js');
    stencilScript.setAttribute('type','module');
    stencilScript.setAttribute('id','stencilloader');
    document.head.appendChild(stencilScript);
}
This code checks if there is already an element with an id of stencilloader. If not it creates a script tag and appends it to the DOM header.
The src attribute is important. My package (in package.json) is named os-aws-location and I published a version 0.0.1 to npm. You have to modify the values according to your configuration.
https://unpkg.com/<package name>@<package version>/dist/<package name>/<package name>.esm.js
Add Loader Action to Demo Screen
In the Demo screen add an OnInitialize event handler and add the RegisterStencil client action to the flow.
One nice thing about Stencil is that the loader script is very small and it automatically lazy loads other elements on demand.
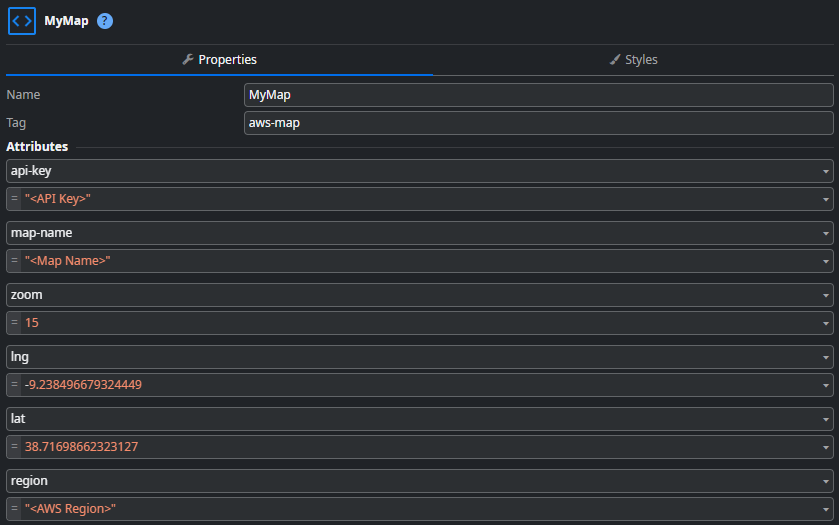
Add HTML Element
With the components tag name now available we can create a custom HTML element on the screen. Drag a custom HTML element to the screen and set the values as follows
Now it's time for a first test. Publish the application and view it in your browser. If the map doesn't appear, check the developer console for any errors.
Add a Marker
Next we want to add a marker to our map using the addMarker method we created in our component.
Add a new Client Action to the Demo screen and drag a JavaScript element to the flow.
In the JavaScript element create a new input parameter WidgetId of type text.
Add the following code
const component = document.getElementById($parameters.WidgetId);
component.addMarker("#FF0000",-9.238496679324449,38.71698662323127);
- Assign the HTML element Id to the WidgetId parameter (for example MyMap.Id).
- Add a Button to the Demo screen and assign the newly created Client Action as Click handler.
Give it a try. When you click the button, a new red marker should appear at the location.
Summary
Stencil can be an excellent option for creating reusable frontend components for OutSystems applications, especially if you need to develop a design system that works both in OutSystems and other frontend technologies.
I would be thrilled to see Stencil fully integrated into OutSystems. Imagine being able to build a complete design system with Stencil, publish it to a GitHub repository, and then, when starting a new Reactive Web Application in OutSystems, have the option to use that GitHub repository as the source for your components. OutSystems could automatically add those components to the widget tree. Wouldn't that be amazing?
But first things first. I am still learning Stencil myself, and there are still plenty of things for me to learn. I will work on my Amazon Location Service library over the coming weeks.
Thank you for reading. I hope you enjoyed it and that I've explained the important parts clearly. If not, please let me know 😊 Your feedback is greatly appreciated.
Follow me on LinkedIn to receive notifications whenever I publish something new.