JSONata is a powerful data transformation and manipulation language for JSON data. The runtime library written in JavaScript was originally developed by IBM and later open sourced. Mikhail Barg later implemented the JSONata query and transformation language in native C# and based on his work I created a wrapping extension for the OutSystems platform.
Why would you need JSONata in OutSystems
Deserializing JSON from REST APIs to OutSystems structures can be challenging in some situations like
Dynamic keys - that is the classic. The API response returns unpredictable keys.
Recursive structures - quite challenging if the API returns nested recursive structures that you need in your application.
Any of - a special case where the API returns different things for a key, for example, either an object or an array of objects.
JSONata assists in manipulating and converting source JSON data into a preferred target format, enabling pain-free deserialization in OutSystems. The key point is the "preferred target format," since JSONata's capabilities extend beyond addressing issues with source JSON data, enabling the transformation of any JSON data into any desired format. This includes a wide array of additional transformations and manipulations, such as data concatenation, element filtering, various calculations, and much more.
Leveraging JSONata for transformation and manipulation of JSON data can help to reduce a server action flow in OutSystems drastically.
In this article, I am referring to transforming JSON data consumed via a REST API, but JSONata can of course also be used to transform response data in exposed REST APIs or for any other use-case dealing with JSON data.
How to use JSONata
Using JSONata is quite simple. You need a source JSON document and a JSONata definition.
A JSONata definition contains all the instructions on how you want to transform and manipulate your source document.
The JSONata Transformation Forge component - specifically the JSONata_IS module - contains a single server action that takes the source document (JsonInput) and the JSONata definition (JsonTransform) as input parameters and returns the transformed result (Result).
To create and try out a JSONata definition you can use the JSONata Exerciser before using it in your application.
JSONata is immensely powerful, and the learning curve can be steep. In this article, I want to give some first, but simple, examples to get up and running with JSONata transformations.
More information on creating transformation and manipulation definitions can be found
Simple Concatenation
For our first example, we just want to concatenate text from multiple attributes into a single attribute.
Our source JSON document looks like this
{
  "fn": "Stefan",
  "ln": "Weber",
  "org": "Telelink"
}
which we want to transform into a single attribute "displayName". The resulting JSON should then look like this
{
  "displayName": "Stefan Weber (Telelink)"
}
To concatenate the three attributes into a single attribute we use the following definition.
{
    "displayName": fn & " " & ln & ($boolean(org) ? " (" & org & ")" : "")
}
Our definition begins with "{" which indicates that the result should be a JSON object.
Within the object, we define an attribute "displayName".
Then we reference the "fn" attribute from the source document (the assumption is that we always have an "fn" attribute and it has a value)
we append a single space followed by the "ln" attribute of the source document (again we assume that the "ln" attribute exists and has a value)
the final part is appending the "org" attribute. In this scenario we cannot assume that the org attribute exists and has a value. We use the $boolean expression that returns false if "org" does not exist or "org" is empty. If true we append the value, if false we add nothing.
We complete the definition with "}" to close the JSON object.
You will find additional information on how to navigate and reference source JSON data in the JSONata documentation. For simple queries use the source attribute name directly. For nested objects use dot notation e.g. "address.street"
Simple Filter by Predicate
You can filter source data at any step using predicate filters. Look at the source document
{
  "fn": "Stefan",
  "ln": "Weber",
  "org": "Telelink",
  "phoneNumbers": [
    {
      "type": "mobile",
      "number": "+49 12345 98765432"
    },
    {
      "type": "office",
      "number": "+49 9876 727273637"
    },
    {
      "type": "home",
      "number": "+49 3847 48374834"
    }
  ]
}
The contact data above has multiple phone numbers. We are only interested in the Office Phone number and our result document should look like this.
{
  "officePhone": "+49 9876 727273637"
}
We apply the following JSONata definition
{
    "officePhone": phoneNumbers[type='office'].number
}
We apply a predicate filter to the "phoneNumbers" attribute by filtering to results where "type" is equal to "office". Then we reference the number attribute.
Attention. This predicate filter can return an array. Try adding another phone number of type "office" and review the result. You will now note that "officePhone" is an array with all phone numbers of type "office". To ensure that it is only a single phone number you need to change your definition as follows to only use the first found office phone number.
{
    "officePhone": phoneNumbers[type='office'][0].number
}
Unify "Any of" responses
This is my personal favorite. In the past, I had to deal with some weird responses in two cases where an attribute can either be an object or an array of objects.
Consider the following responses from an API. In the first JSON document the API returned an object for the attribute "authors" (single author). In the second JSON document, the "authors" attribute is an array of objects (multiple authors).
First example - object
{
  "title": "How to get started with OutSystems",
  "authors": {
    "name": "Stefan Weber",
    "avatarUrl": "https://sample.co/stefan-weber.png"
  }
}
Second example - array of objects
{
  "title": "How to get started with OutSystems",
  "authors": [
    {
      "name": "Stefan Weber",
      "avatarUrl": "https://sample.co/stefan-weber.png"
    },
    {
      "name": "Max Mustermann",
      "avatarUrl": "https://sample.co/max-mustermann.png"
    }
  ]
}
To ensure that we can deserialize this easily in OutSystems into a unified structure we want to transform our source data of authors always into an array. We use the following definition to achieve this
{
    "title": title,
    "authors": $type(authors) = "array" ? authors : [ authors ]
}
The $type expression returns the type of the "authors" attribute in the source document. If it is an array, we simply add the "authors" attribute (which is already an array). Otherwise, we wrap the source "authors" attribute with brackets, thus resulting in an array with a single object.
Dealing with arbitrary attribute names is not that uncommon. Consider the following example source document
{
  "title": "Sample Metadata",
  "versions": {
    "ab456fd": {
      "createdOn": "2023-10-10T10:30:00Z",
      "size": 540,
    },
    "f99da55": {
      "createdOn": "2023-10-10T10:35:00Z",
      "size": 320
    },
    "d33abba": {
      "createdOn": "2023-10-09T08:00:00Z",
      "size": 100
    }
  }
}
The "version" attribute contains an object with attributes that have an unpredictable name, e.g. a unique version identifier. This structure cannot be deserialized by default in OutSystems, but if we modify the source versions attribute to an array of equivalent objects, we can. A target format could look like this
{
  "title": "Sample Metadata",
  "versions": [
    {
      "version": "ab456fd",
      "createdOn": "2023-10-10T10:30:00Z",
      "size": 540
    },
    {
      "version": "f99da55",
      "createdOn": "2023-10-10T10:35:00Z",
      "size": 320
    },
    {
      "version": "d33abba",
      "createdOn": "2023-10-09T08:00:00Z",
      "size": 100
    }
  ]
}
The target format "versions" attribute is now an array and the arbitrary attribute name becomes an attribute (version) of an array element. To transform the source into this target format the following definition is used
{
    "title": title,
    "versions": versions.$each(function($value, $key) {
        {
            'version': $key,
            'createdOn': $value.createdOn,
            'size': $value.size
        }
    })
}
Here we iterate over the attributes of the "versions" source attribute and construct an object with "version" set to the $key and "createdOn" and "size" to the corresponding $value elements.
Calculating a sum over an array of elements
The last example in this article is quite simple. It shows how to calculate a sum over an array of items.
Here is the - quite simple - source document
{
  "invoiceNumber": 3984893,
  "items": [
    {
      "productId": 838,
      "amount": 950.60
    },
    {
      "productId": 21321,
      "amount": 12.0
    },
    {
      "productId": 232,
      "amount": 77.50
    }
  ]
}
We have an array of items each with an amount. In our target structure we are only interested in the total sum of all items. Our target format should look like this
{
  "invoice": 3984893,
  "sum": 1040.1
}
The definition for creating a sum looks like the following by using the $sum expression for "items.amount".
{
    "invoice": invoiceNumber,
    "sum": $sum(items.amount)
}
How to add JSONata to an OutSystems Application
The examples above should give you a quick overview of the possibilities you get with JSONata transformations. Check the JSONata documentation for additional transformation and manipulation capabilities.
In the final part of this article, we look at how to integrate JSONata into an OutSystems application.
Make sure that you already have downloaded the JSONata Transformation Forge component to your OutSystems factory.
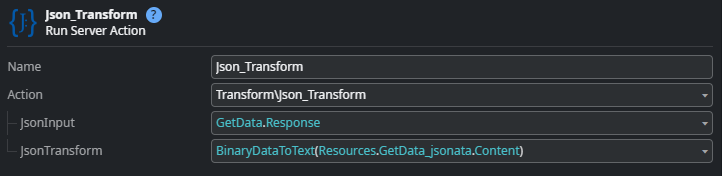
Add a dependency to the Json_Transform action from the JSONata_IS module,
Add a dependency to BinaryDataToText action from the BinaryData extension.
Prepare your definitions
Use the JSONata Exerciser to prepare all the JSONata definitions you need. For each definition create a text file. My naming convention for JSONata definitions is <Purpose>.jsonata.
Upload definitions to Resources
In the Data tab in Service Studio create a new folder Transforms and upload your definition files.
Next is to create a server action. For this example, we assume that you query a REST API first. The REST action you call returns the result as text. (Output set to data type of text which returns the whole JSON payload as text)
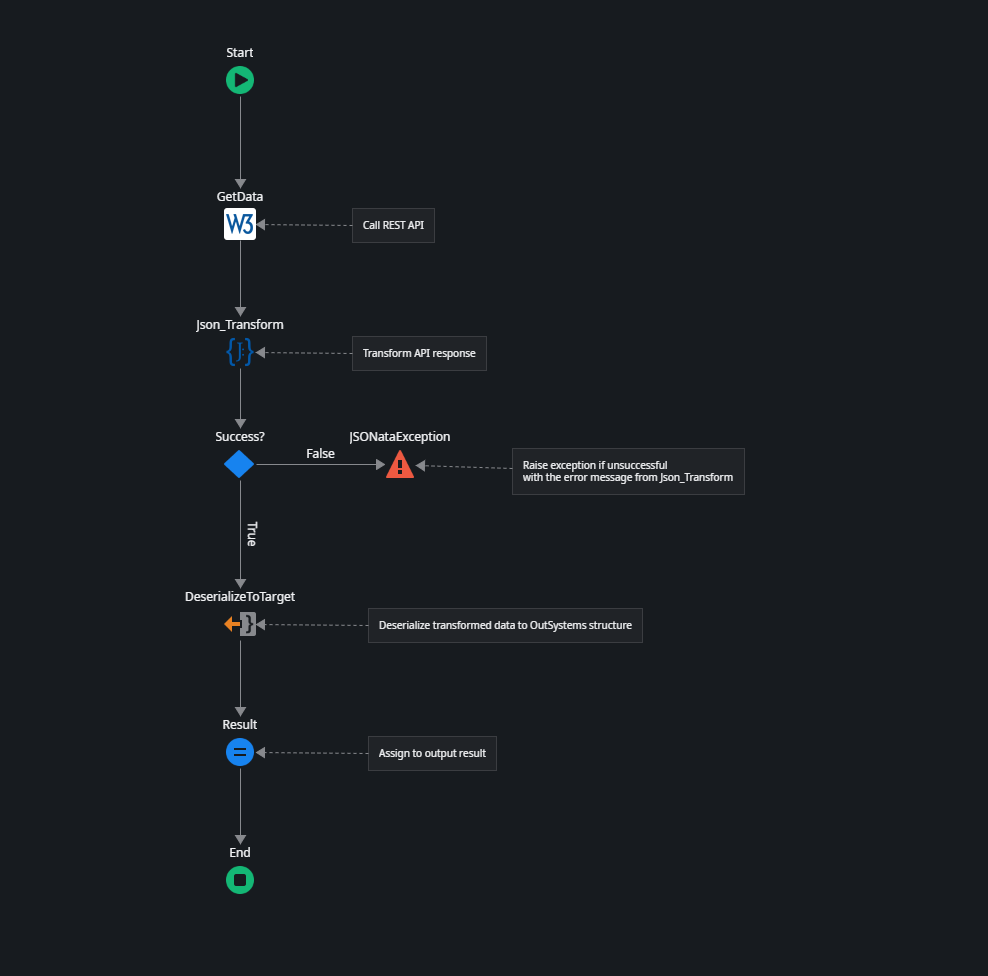
Summary
Thats it.
JSONata is a powerful addition for complex JSON transformations and manipulations. It can drastically reduce your server action flows by offloading transformations to a definition file. The JSONata Transformation Forge component based on the work of Mikhail Barg makes it easy to integrate with your applications.
Thank you for reading. I hope you liked it and that i have explained the important parts well. Let me know if not 😊
If you have difficulties in getting up and running, please use the OutSystems Forum to get help. Suggestions on how to improve this article are very welcome. Send me a message via my OutSystems Profile or write a comment.