

Send Actionable Messages from OutSystems Applications
A tutorial on how to enhance an OutSystems application with the possibility to send interactive E-Mails using Microsoft Actionable Messages.

Throughout my diverse career, I've accumulated a wealth of experience in various capacities, both technically and personally. The constant desire to create innovative software solutions led me to the world of Low-Code and the OutSystems platform. I remain captivated by how closely OutSystems aligns with traditional software development, offering a seamless experience devoid of limitations. While my managerial responsibilities primarily revolve around leading and inspiring my teams, my passion for solution development with OutSystems remains unwavering. My personal focus extends to integrating our solutions with leading technologies such as Amazon Web Services, Microsoft 365, Azure, and more. In 2023, I earned recognition as an OutSystems Most Valuable Professional, one of only 80 worldwide, and concurrently became an AWS Community Builder.
Actionable Messages
Actionable Messages refer to regular HTML emails that contain an interactive visual UI component in the form of an Adaptive Card.
Adaptive Cards Overview - Adaptive Cards | Microsoft Learn
Adaptive Cards provide a blueprint as JSON for interface elements such as text, input boxes, and others, leaving the visual representation up to the Host Application that renders the document. Popular Microsoft products like Outlook (which uses Adaptive Cards as part of an Actionable Message) and Teams natively support Adaptive Cards. Furthermore, Microsoft offers a range of SDKs that enable developers to integrate Adaptive Card rendering into custom applications.
Adaptive Cards can be found and used in many Microsoft products like Outlook, Teams, Loop, Viva, and Copilot.
This article focuses on the usage of Adaptive Cards in Actionable Messages, which is limited to Microsoft Outlook Desktop, Mobile, and Web editions. Non-Microsoft email clients are unable to display embedded Adaptive Cards, although they can show all other email content. This provides a fallback option in case Adaptive Cards are not supported.
Throughout the rest of this article, we will utilize the term Actionable Message, which refers to an HTML email that includes an embedded Adaptive Card.
Why Actionable Messages?
Actionable Messages are well-suited for a variety of use cases that require interactive and personalized email experiences, such as:
Workflow approvals and rejections
Quick task completions
Survey and poll responses
Booking and reservation confirmations
These use cases share a common trait in that they are small and can be completed quickly. However, it is not advisable to use Actionable Messages when the user is required to read extensive information or complete a large form or dataset.
With Actionable Messages, users can easily perform simple tasks directly within their email without having to leave Microsoft Outlook. Moreover, Actionable Messages can dynamically adjust to the current state of a task. But what exactly does this mean?
Let us consider the following scenario:
Employees may submit a request to participate in a training session through a designated web page, where they select a training course and provide reasons for attending.
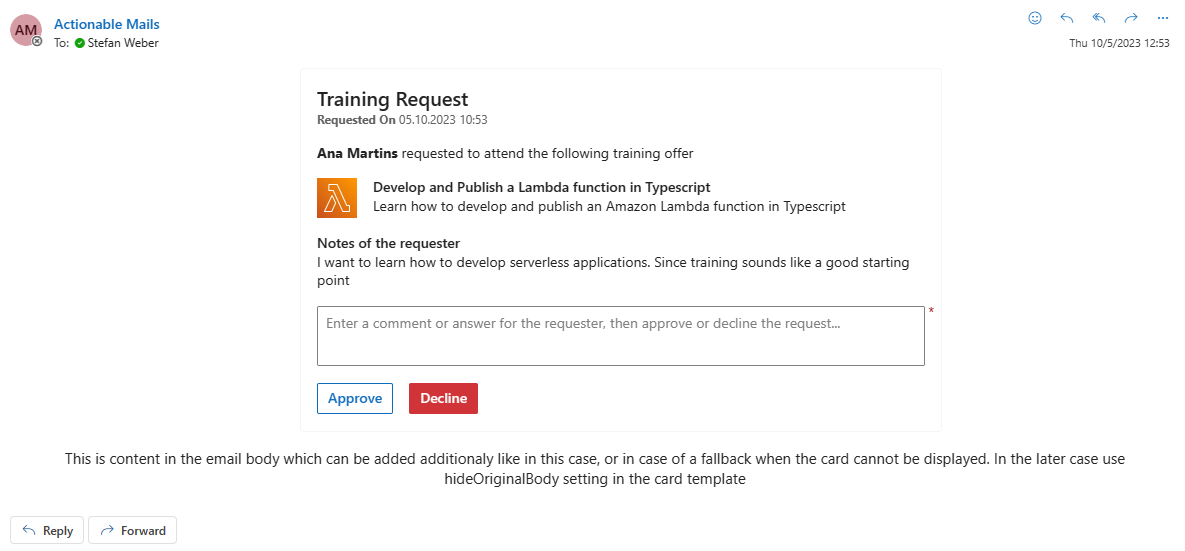
With such a request, an Actionable Message is sent to the superior, with details about the requester, the chosen training, and decision buttons for approval or rejection, accompanied by an input field for additional decision-related notes.
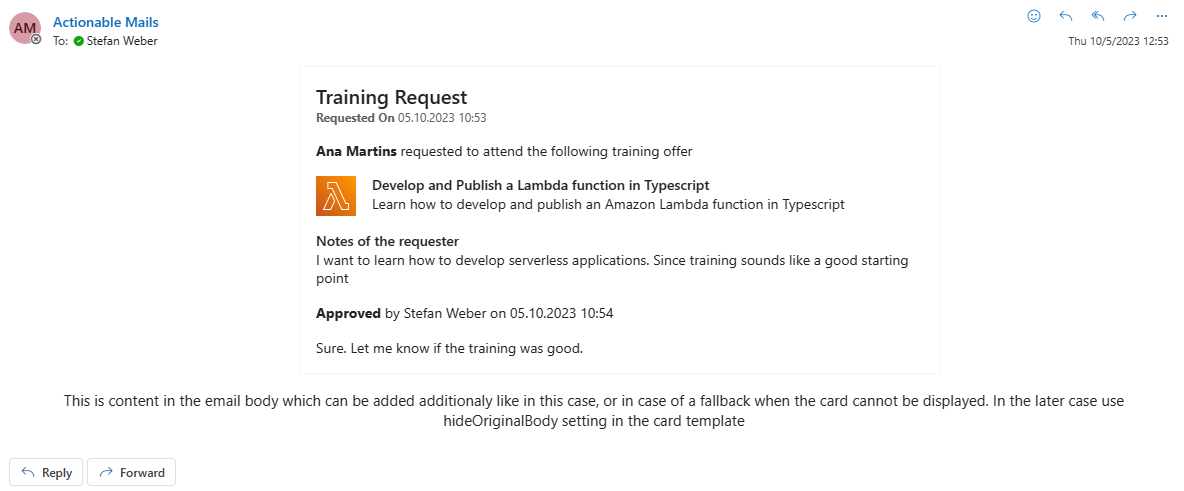
Should the superior approve or deny the request, the Actionable Message updates to display the new status and confirm the request’s approval or rejection.
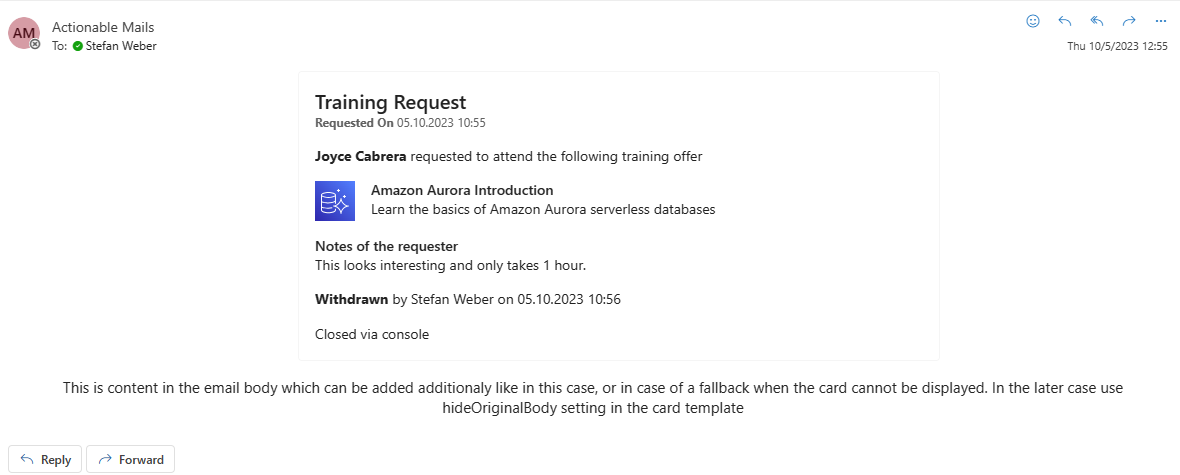
A particular scenario to address involves the requester withdrawing their request after the Actionable Message has already been sent to the superior. In this instance, the Actionable Message must update to reflect the withdrawal.
This scenario shows the benefits of employing Actionable Messages, enabling all actions to be executed directly within the email inbox. Decisions and status of a request are reflected in the e-mail for later review.
Actionable messages are regular e-mail messages. As we all know, mail messages get easily deleted or just do not catch the attention of a mail receiver. Additional measures should be taken to compensate for this challenge.
What you will learn
The intention of this article is to get you up and running with Actionable Messages sent from an OutSystems application. The article shows one way of doing so by sending an Actionable Message via a Microsoft Exchange Shared Mailbox using the Graph API, but you can apply the same steps and send it via any other external e-mail provider.
Specifically, you will learn how to prepare your environment to send Actionable Messages and the implementation details in OutSystems using prebuilt components on OutSystems Forge.
Forge Components
Make sure that you have downloaded and installed the following Forge components to your OutSystems Factory.
Adaptive Cards
This component provides two server actions
AdaptiveCard_ExpandTemplate — This server action takes an Adaptive Card Template, merges it with your data and generates a usable Adaptive Card.
AdaptiveCard_ActionableMessageCardSign — This server action digitally signs an Adaptive Cards and packs the card and the signature into a JSON Web Token to be used in a e-mail body.
Adaptive Cards - Overview | OutSystems
You will learn more about the two server actions throughout the article.
Actionable Message Sample
This is a demo application that uses the Adaptive Cards component. We will use that demo application to walk through the implementation details.
Actionable Message Sample - Overview | OutSystems
OAuth Token Exchange
A helper component to request an Access Token from an OAuth 2.0 compatible Identity Provider. This component is used to request credentials from Microsoft Identity Provider Azure AD for accessing the Graph API to send an e-mail.
OAuth Token Exchange - Overview | OutSystems
Adaptive Cards, Actionable Message Sample and OAuth Token Exchange are my personal Forge contributions.
JWT
In addition, the demo application makes use of the JWT Forge component.
JWT is jointly developed and maintained by multiple community members. Check the component page for details.
The Big Picture
Adaptive Cards and Actionable Messages is a big topic and i cannot cover all in this article. Nevertheless, let us discover the overall process related to the Actionable Message Sample, which implements the scenario outlined above.
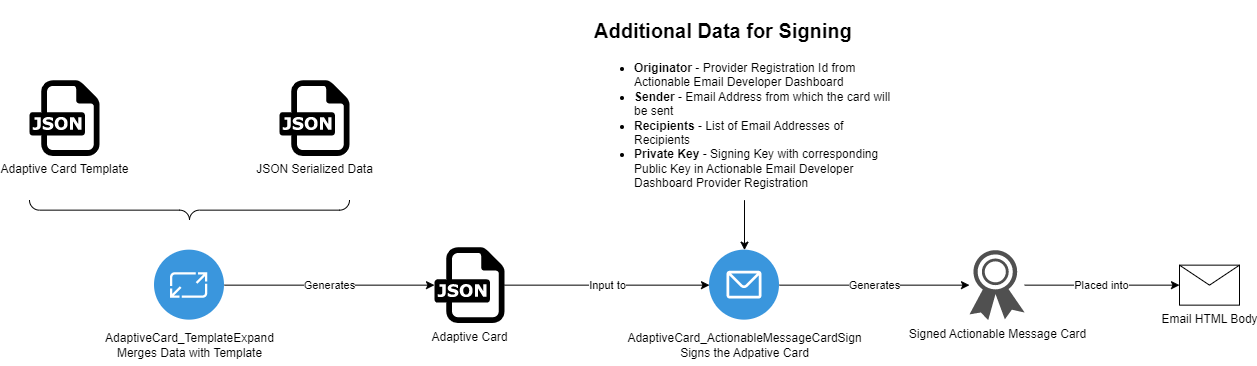
- The first step is to create an Adaptive Card. This is done by merging an Adaptive Card template with JSON serialized data. Merging a template with data produces an Adaptive Card.
Designing cards is not part of this article, but you will find some information on how to create Adaptive Card templates at the end of this article. For now, just remember that a template contains placeholders that are filled with actual data.
The next step is to sign the Adaptive Card with a private key. Signing is not necessary in all sending scenarios, but Microsoft recommends signing in any case.
The last step is to embed the signed card into an e-mail HTML body and send the Actionable Message.
The receiver of the Actionable Message can now review the request, enter a comment, and click either the Approve or Decline button.
Approve and decline both initiate a POST request to an exposed REST API endpoint which processes the decision and sends back and updated card reflecting the new state.
If the applicant has withdrawn his request in the meantime the card gets updated to reflect the status.
Now it is time to get your hands dirty. Let’s start with the preparational tasks to complete before you can try out the sample application.
Preparations
Before we can try out the demo application and send Actionable Messages to recipients, we must do some preparational tasks. You will need to have the following permissions
Access to Azure App Registrations and permission to register a new application.
Access to Microsoft 365 Exchange Admin Center and permission to create a shared mailbox.
Access to Actionable Email Developer Dashboard (see below)
You will also need a Windows PC with the ability to execute a PowerShell script.
Register Application in Azure App Registrations
We will send our Actionable Messages using Microsoft Graph API and a shared mailbox in Exchange. To obtain an access token to authorize this Microsoft Graph operation, we need to:
Register an application in Azure App Registration
Grant the application Mail.Send permission
Create a client secret
In Azure Portal
Search and switch to App registrations resource
Select New registration
Enter a name and select Accounts in this organizational directory only. Then click Register.
From the Overview page copy Application (client) ID and Directory (tenant) ID. We will need both later when configuring the demo application.
In the API permissions menu click Add permissions — Microsoft Graph — Application permissions.
Search and select Mail.Send permission then click Add permission.
Back in the permissions list click on Grant admin consent for <your tenant>. This is a necessary step to allow our application to acquire these permissions.
Your screen should look like this now
Important Note: Mail.Send grants the application to send mails on behalf of all mailboxes in your organization. In a production environment you should limit that. Read the following documentation on how to limit application permissions to specific mailboxes.
In the Certificates & secrets menu in the Client secrets tab. Click on New client secret.
Enter a description and leave the default expiration. Then click Add.
Immediately copy the value of the new client secret. It will only display once and cannot be retrieved later once you leave the screen.
This completes this task. At the end you must have the values for
Application (client) ID
Directory (tenant) ID
Client Secret Value
Create a Shared Mailbox in Microsoft 365 Exchange
Next, we need a shared mailbox which we can use to send messages from.
In the Exchange admin center of Microsoft 365
Under Recipients — Mailboxes click on Add a shared mailbox
Enter a Display name and an e-mail address then click Create.
By default, the Mail.Send permission allows the application to send on behalf of any mailbox including our newly created shared mailbox.
With this task completed you should note down the
- E-Mail address of the shared mailbox
Create Public-Private Key Pair for Signing Actionable Messages
Although not needed in all scenarios — especially not when sending through Graph API — Microsoft recommends signing Actionable Message Cards.
You can read more about Security requirements of Actionable Messages in the documentation.
Security requirements for actionable messages - Outlook Developer | Microsoft Learn
Signing an Actionable Message Card is easy with the Adaptive Cards Forge component, but we must create an RSA public-private key pair first.
Using Powershell run the following commands in a folder
$rsa = New-Object System.Security.Cryptography.RSACryptoServiceProvider -ArgumentList 2048
$rsa.ToXmlString($true) | Out-File private-key.xml # Private Key
$rsa.ToXmlString($false) | Out-File public-key.xml # Public Key
This will create two files, one with the private key and one with the associated public key, both in XML format. The reason for XML we see in a bit.
Having both keys completes this task with
Private Key for signing Actionable Message Cards
Public Key for validating the signature of Actionable Message Cards
Register Provider in Actionable Email Developer Dashboard
To send Actionable Messages you need to register your application (provider) with Microsoft. Provider registration has three levels:
Test — For testing purposes only. You can send Actionable Messages to a list of specified recipients in your tenant only.
Organization — You can send Actionable Messages to any recipient within your organization.
Global — You can send Actionable Messages to any Office 365 user in any tenant.
Registrations for an Organization must be approved by one of your Exchange Administrators. Microsoft must approve global registrations first. After approval, it takes 24 hours for Organization registrations and up to two weeks for Global registrations to become active. Test registrations are auto-approved.
If for any reason your Exchange Administrators do not get an approval e-mail, then ask them to visit this link https://outlook.office.com/connectors/oam/admin to approve your registration.
We will be using a Test registration for our demo application.
In the Actionable Email Developer Dashboard
Click on New Provider
Enter a Friendly Name
Copy the value of the Provider Id (originator) field. We need that value later to configure our demo application.
For Sender email address from which actionable emails will originate enter the mail address of the shared mailbox you created.
For Target URLs enter the https URL to your OutSystems environment (e.g. p8478392423.outsystemscloud.com)
Copy the contents of the public-key.xml file you created during public-private key pair creation to the Public Key field.
This is the reason we created the key pair in XML format and not PEM encoded. The Dashboard only accepts public keys in XML format.
- Under Scope of submission select Test Users
Depending on the scope of the submission you will have to provide additional information.
In the Test user email addresses text area enter all recipient email addresses — separated by semi-colon — that should be able to receive an Actionable Message.
Select the I accept the terms and conditions of the App Developer Agreement checkbox. Then click Save to complete the provider registration.
It will take up to a few hours until your test registration takes effect. In my cases it took between 2 and 6 hours for a test provider registration to become effective.
With registering the provider in the Actionable Email Developer Dashboard this task is completed and you should have copied the following information
- Provider Id (originator)
Configure Demo Application
The final preparational task is configure some site properties of the demo application.
In Service Center
- Go to Factory — Modules and search and select the ActionableMessageSample module.
In the Site Properties tab fill in the values for
ActionableMessageOriginator — Taken from the Register Provider in Actionable Email Developer Dashboard task
ActionableMessagePrivateKey — The contents of the private-key.xml file you created in the Create Public-Private Key Pair for Signing Actionable Messages task.
AzureClientId — Client Id copied from Azure App Registration
AzureClientSecret — Client Secret copied from Azure App Registration
AzureTenantId — Tenant Id copied from Azure App Registration
SenderMailAddress — Mail Address of the shared mailbox you created in the Create a Shared Mailbox in Microsoft 365 Exchange task.
As usual the security reminder here: Secrets shouldn’t be stored in site properties but instead in a secure credentials management solution like AWS Secrets Manager or Hashicorp Vault.
Configuring the demo application is the final preparational task and we can now go ahead and try it out.
Try the Demo Application
Go ahead and launch the demo application.
- Add a new training request by filling out the form on the right.
Note: If you have registered a test provider in the Actionable Email Developer Dashboard the “Send for approval to” e-mail address must match a recipient e-mail address you entered in the provider configuration.
Check that you have received the Actionable Message and approve or decline the request. The card should then immediately update to reflect the new status.
Add another training request and wait until you have received the Actionable Message. Then Withdraw (Ellipsis button in the table) the request. In your inbox the Actionable Message should update to reflect the withdrawal.
Note: The Actionable Message refreshes when you click on the e-mail in your inbox. If you have already selected the e-mail first, click on another e-mail and then return to trigger the refresh.
Implementation Details
Let’s dive into the technical details of the implementation. We start with looking at the Adaptive Card templates that are used.
Open the sample application in Service Studio
Adaptive Card Templates
In the Data tab under resources, you will find two JSON documents
sample.card.json
sample-final.card.json
Download both and open them in an editor.
sample.card.json is the adaptive card template that is used when a request is sent to the approving party. It contains a text area and two action buttons for approving or declining the request.
Let's look at the actions
{
  ...
  "actions": [
    {
      "type": "Action.Http",
      "title": "Approve",
      "style": "positive",
      "method": "POST",
      "url": "${$root.apiUrl}",
      "id": "approveRequest",
      "headers": [
        {
          "name": "Content-Type",
          "value": "application/json"
        }
      ],
      "body": "{\"decision\": \"APPROVE\",\"reason\": \"{{reason.value}}\"}"
    },
    {
      "type": "Action.Http",
      "title": "Decline",
      "style": "destructive",
      "method": "POST",
      "url": "${$root.apiUrl}",
      "id": "declineRequest",
      "headers": [
        {
          "name": "Content-Type",
          "value": "application/json"
        }
      ],
      "body": "{\"decision\": \"DECLINE\",\"reason\": \"{{reason.value}}\"}"
    }
  ]
  ...
}
Each action (a button) executes a HTTP Post request to a URL. The “url” property here contains a placeholder for external data.
The “body” that is sent with the request contains a JSON document (encoded) with the decision and a reason. The “reason” property is bound to the value of text area of the card.
{
  "type": "Input.Text",
  "id": "reason",
  "placeholder": "Enter a comment or answer for the requester, then approve or decline the request...",
  "isMultiline": true,
  "isRequired": true
}
The template property “autoInvokeAction” is another HTTP call (GET in this case) that is triggered every time the receiver clicks on the e-mail to refresh the state of the Actionable Message.
{
  "autoInvokeAction": {
    "method": "GET",
    "url": "${$root.apiUrl}",
    "type": "Action.Http"
  }
}
On top of the template, you will find another very import property “originator”. This one must be present in Actionable Message cards and contain the registration provider id. In our case the property is bound to a data element.
{
  "originator": "${$root.originator}"
}
The sample-final.card template is used once a request is either approved, declined, or withdrawn. The final template does not include any actions and does not have an “autoInvokeAction” defined. It is considered final and permanent.
Note: Adaptive Card version must be set to 1.0 for Actionable Messages. At least for now.
Card Data Structure
Still in the Data tab under structures, look at the Card data structure. This structure is used to create the source JSON data document that will get merged with the Adaptive Card templates.
After serializing a Card it will produce something like this
{
  "originator": "<your originator id>",
  "apiUrl": "https://<your environment url>/ActionableMessageSample/rest/Training/request/b2fe46d0-8f12-4234-a454-76ef109ab4e2",
  "requestId": "b2fe46d0-8f12-4234-a454-76ef109ab4e2",
  "requestedByName": "Max Mustermann",
  "requestedAt": "2023-03-04T16:00:03Z",
  "requestState": "Approved",
  "closedByName": "Stefan Weber",
  "closedAt": "2023-04-01T10:00:00Z",
  "closedReason": "Yes, approved. Have fun at the training!",
  "comment": "Let me do this",
  "training": {
    "title": "OutSystems Jumpstart",
    "description": "Lets dive into low coding with OutSystems",
    "imageUrl": "https://<your environment url>/ActionableMessageSample/img/ActionableMessageSample.apigateway.svg"
  }
}
If you now look at one of the Adaptive Card templates, you will note that these properties reflect the data placeholders in the template with a syntax of ${root.<property>}.
Request_Create Server Action
In the Logic tab open the Request_Create server action. This action is executed when you submit a request from the screen.

It creates a new Request record
Retrieves the Adaptive Card for the created Request by calling the server action GetAdaptiveCardForRequest.
It signs the Adaptive Card using the private key taken from site properties along with additional information required for the signature payload.
After that it embeds the signed Adaptive Card into a HTML document which becomes the e-mail body.
<html>
<head>
    <meta http-equiv=""Content-Type"" content=""text/html; charset=utf-8"">
</head>
<body>
    <div style=""text-align:center;"">This is content in the email body which can be added additionaly like in this case, or in case of a fallback when the card cannot be displayed. In the later case use hideOriginalBody setting in the card template</div>

    <section itemscope itemtype=""http://schema.org/SignedAdaptiveCard"">
        <meta itemprop=""@context"" content=""http://schema.org/extensions"" />
        <meta itemprop=""@type"" content=""SignedAdaptiveCard"" />
        <div itemprop=""signedAdaptiveCard"" style=""mso-hide:all;display:none;max-height:0px;overflow:hidden;"">" + AdaptiveCard_ActionableMessageCardSign.Result + "</div>
    </section>
</body>
</html>
- And finally sends the e-mail via a Graph API call.
GetAdaptiveCardForRequest Server Action
This server action returns the Adaptive Card for a given Request Identifier.
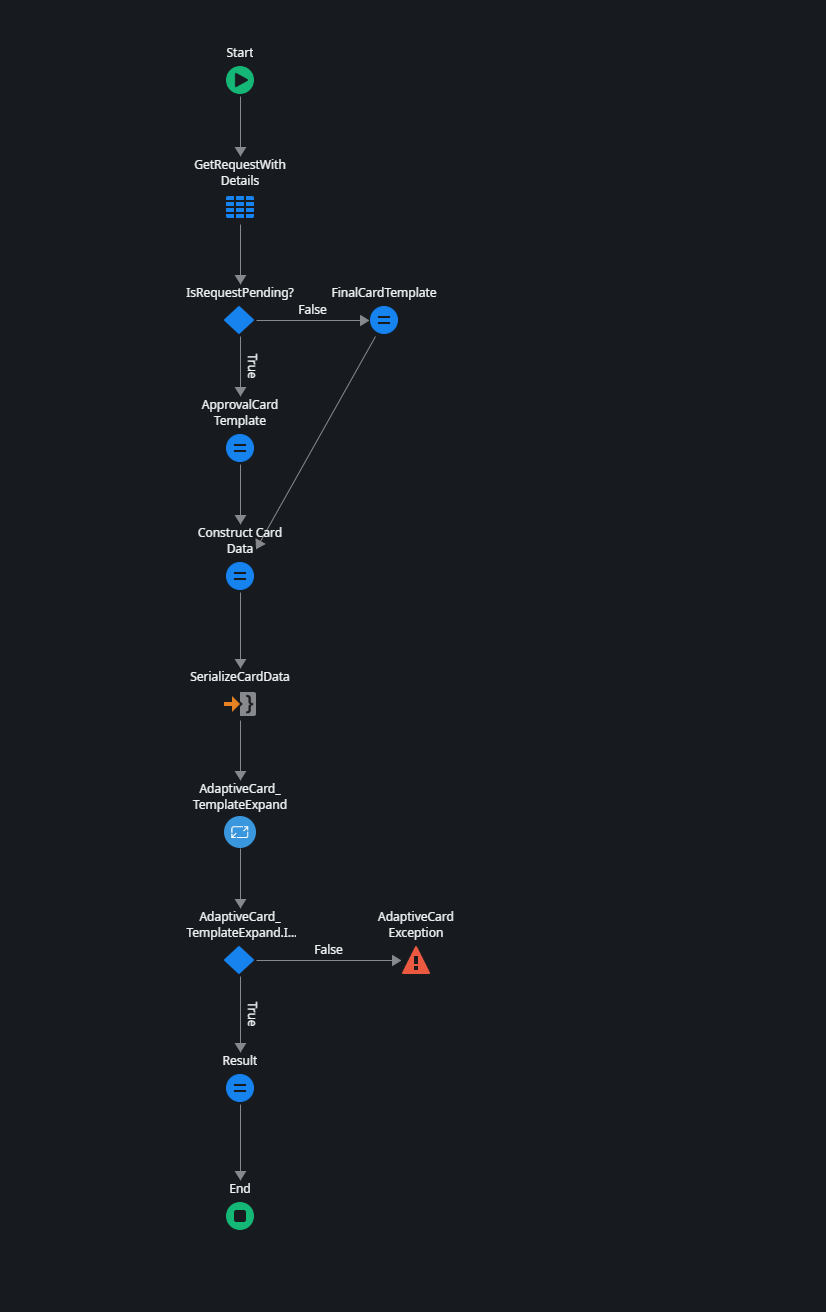
It queries the database for the Request
Depending on the state of the Request it either retrieves the sample.card.json (Pending) or sample-final.card.json (any other state) template.
It constructs the card data by assigning values from the query.
Then it serialized the card data.
AdaptiveCard_TemplateExpand merges the template with the serialized card data and generates the final Adaptive Card.
At letast, the Adaptive Card is returned as result.
Exposed REST API Endpoints
Go down to REST Integrations section in the Logic tab. There is one exposed REST API “Training” with two configured endpoints.
- GetRequest — is called by the “autoInvokeAction” property of the Actionable Message.
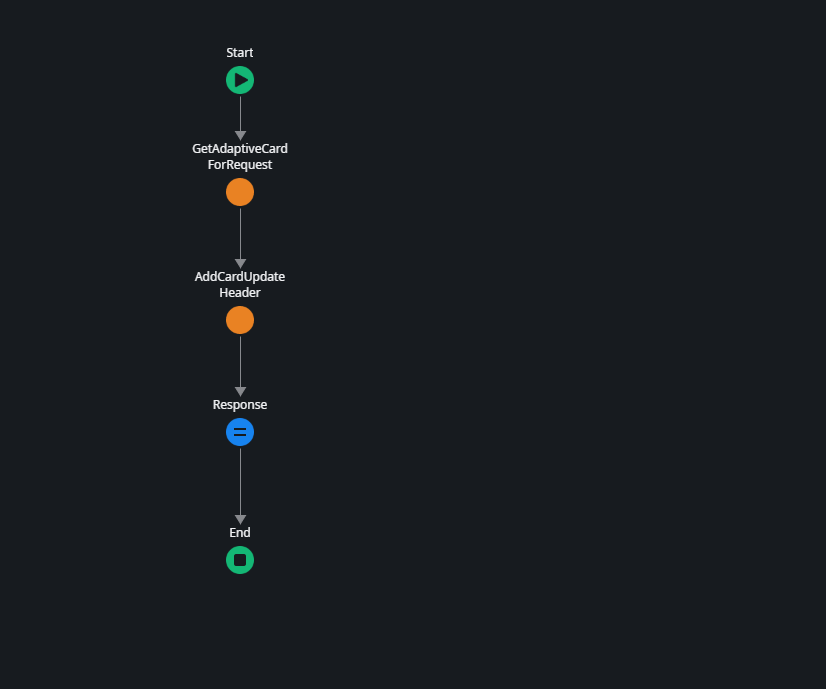
GetRequest takes the RequestId as input parameter and then uses the GetAdaptiveCardForRequest server action to get the Adaptive Card.
Before returning the Adaptive Card as a result, the server action sets a specific header “CARD-UPDATE-IN-BODY” to “true” which tells Outlook that the response returns an updated card which should replace the current card.
- PostRequest — This endpoint is triggered by both the Approval and Decline action.
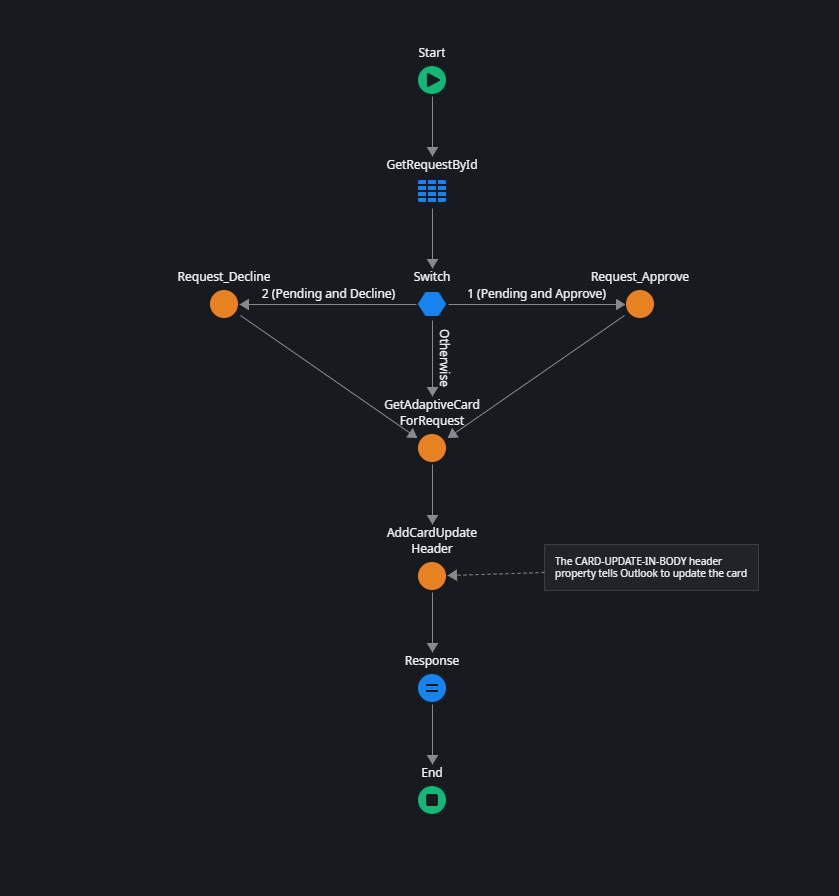
PostRequest handles the decisions taken by the approval party. Based on the decision it sets the Request to either Approved or Declined and saves the reason (CloseReason in entity).
After that or in any other case it returns the updated card back to Outlook.
Authenticating Outlook User
The last question we must deal with is how we get a user context.
With every card HTTP action Outlook sends the access token of the user in the Authorization header. We can use that token and extract the Subject claim which contains the users principal name (e-mail address).
Open the OnAuthentication event handler action of the Training API.
Please note that this implementation is extremely basic. It does not validate an access token and in a production environment you should always validate an access token.
More information on access token validation you will find in my article “Protect OutSystems REST APIs using OpenID Connect”.
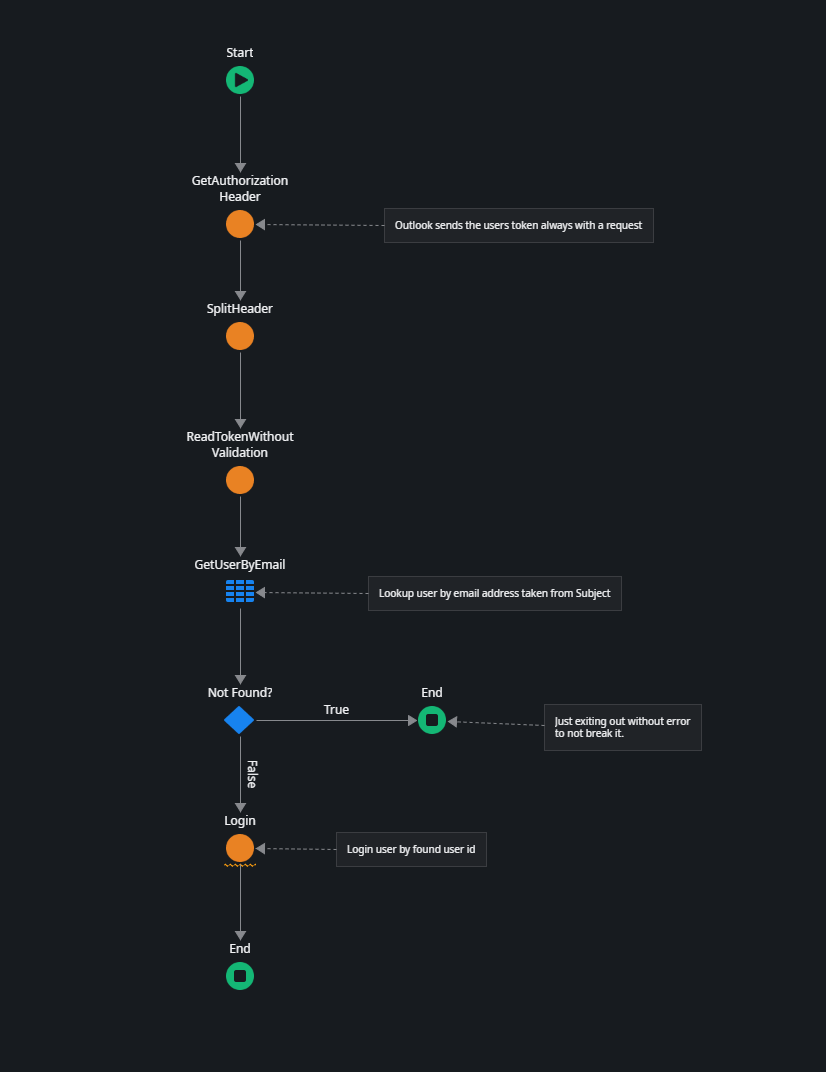
The OnAuthentication Handler does the following
It gets the Authorization header from the request (GetAuthorizationHeader)
Splits the header value in “Bearer” and “<token>”
Decodes the token without validation using the JWT forge component.
Queries the user table to retrieve a user account with the e-mail address retrieved from the sub claim (Subject) of the token.
If found it performs a user login. If not, it just exits out (which should normally not be the case of course)
A logged in user account allows the use of GetUserId() which is used to set the ClosedBy value.
Summary
Actionable Messages with embedded interactive Adaptive Cards can significantly enhance the user experience of an application. This is especially true for stakeholders who perform simple tasks like approvals in an application. They can perform everything directly from their Outlook inbox without needing to browse to an application first.
Although the preparational tasks and designing cards can be challenging, the technical implementation of OutSystems is quite simple. Once implemented, you can send any Actionable Message to any recipient of your organization or even to external recipients.
Thank you for reading. I hope you liked it and that i have explained the important parts well. Let me know if not 😊
If you have difficulties in getting up and running, please use the OutSystems Forum to get help. Suggestions on how to improve this article are very welcome. Send me a message via my OutSystems Profile or write a comment.
Add-on: Designing Adaptive Card Templates
Adaptive Card Templates are JSON documents that can be created using any editor following the Adaptive Cards schema.
In the context of Actionable Messages, there are a few variations and additions to the schema. More information on this you will find in the Actionable Messages documentation under “Outlook-specific Adaptive Card properties and features”.
There are two tools available that help to design Adaptive Card templates.
Actionable Message Designer — A visual tool to build your Actionable Message cards.
Adaptive Card Studio — Studio is a Visual Studio Code plugin by MadeWithCards.
MadeWithCards is also a great resource for everything around Adaptive Cards.
Adaptive Card templates are merged with data to build the final card.