

Microsoft Teams Message Extensions with OutSystems
Build an API-based message extension with Microsoft Teams Developer Portal and OutSystems the Low-Code way

Throughout my diverse career, I've accumulated a wealth of experience in various capacities, both technically and personally. The constant desire to create innovative software solutions led me to the world of Low-Code and the OutSystems platform. I remain captivated by how closely OutSystems aligns with traditional software development, offering a seamless experience devoid of limitations. While my managerial responsibilities primarily revolve around leading and inspiring my teams, my passion for solution development with OutSystems remains unwavering. My personal focus extends to integrating our solutions with leading technologies such as Amazon Web Services, Microsoft 365, Azure, and more. In 2023, I earned recognition as an OutSystems Most Valuable Professional, one of only 80 worldwide, and concurrently became an AWS Community Builder.
Microsoft Teams Message Extensions are straightforward enhancements to the chat experience in Microsoft Teams.
Before Microsoft introduced the option for API-based Message Extensions, the only methods for creating Message Extensions were through the Bot Framework using the Teams Toolkit or by manually provisioning a Bot resource and configuration in your Azure tenant.
API-based Message Extensions make it much easier to add data from your application to Microsoft Teams. However, at the time of writing this article, API-based Message Extensions only support search commands, but I am confident that action commands and link unfurling will follow soon.
Search commands, as the name implies, allow you to enter a search term in your Teams client. The search term is then sent to a defined REST API endpoint, which returns a search result. The search result is mapped to a preview template that displays the results in either a grid or list-based style.
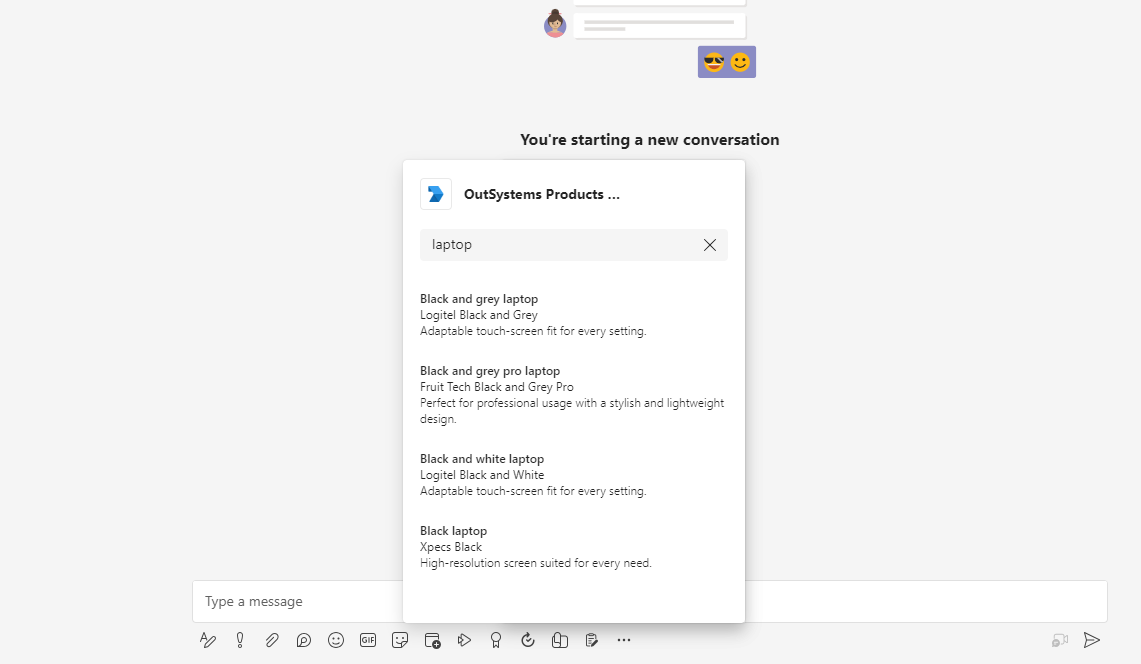
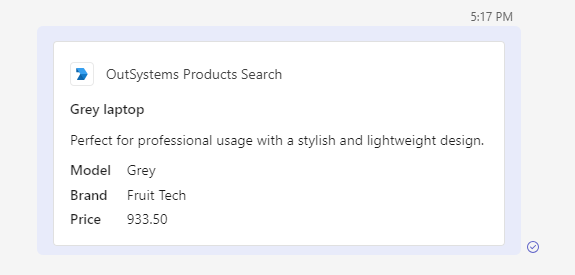
When you select an entry, the data is mapped to an adaptive card template, and you can send the rendered card to the channel.
An API-based Message Extension consists of the following components:
A REST API endpoint takes a search term as an input parameter and returns results. In OutSystems, this is an exposed REST API endpoint with a single URL input parameter (e.g., search) and a result response.
An OpenAPI Version 3.x file describes the REST API. Unfortunately, OutSystems only generates a Swagger file (Version 2), but luckily, you can easily convert from version 2 to 3.
A response template is used for rendering the results of your API. The API results are combined with Adaptive Card templates. This response template establishes the data mapping between your REST API data and card elements, as well as the visual appearance of your cards.
A Microsoft Teams app created in the Microsoft Teams Developer Portal. Technically, the Teams Developer Portal serves as the visual counterpart to the Teams Toolkit available for Visual Studio Code. In this portal, you can configure various features of your Teams application.
A registered application in Microsoft Entra. If your REST API endpoint is public, then this step is optional. However, you will need this if you want to protect your endpoint and authorize requests to resources. (Next article on Message Extensions with OutSystems)
Building a Microsoft Teams Message Extension
Let's begin by walking through the essential implementation steps.
REST API Endpoint
Building the REST API endpoint in OutSystems is quite straightforward. I created a sample project published on Forge that you can use to follow along. The sample service uses data from the OutSystems Sample Data component.
Download the sample service and open the MessageExtensionAPI module.
The component has a single exposed REST API GET endpoint, GetProducts.

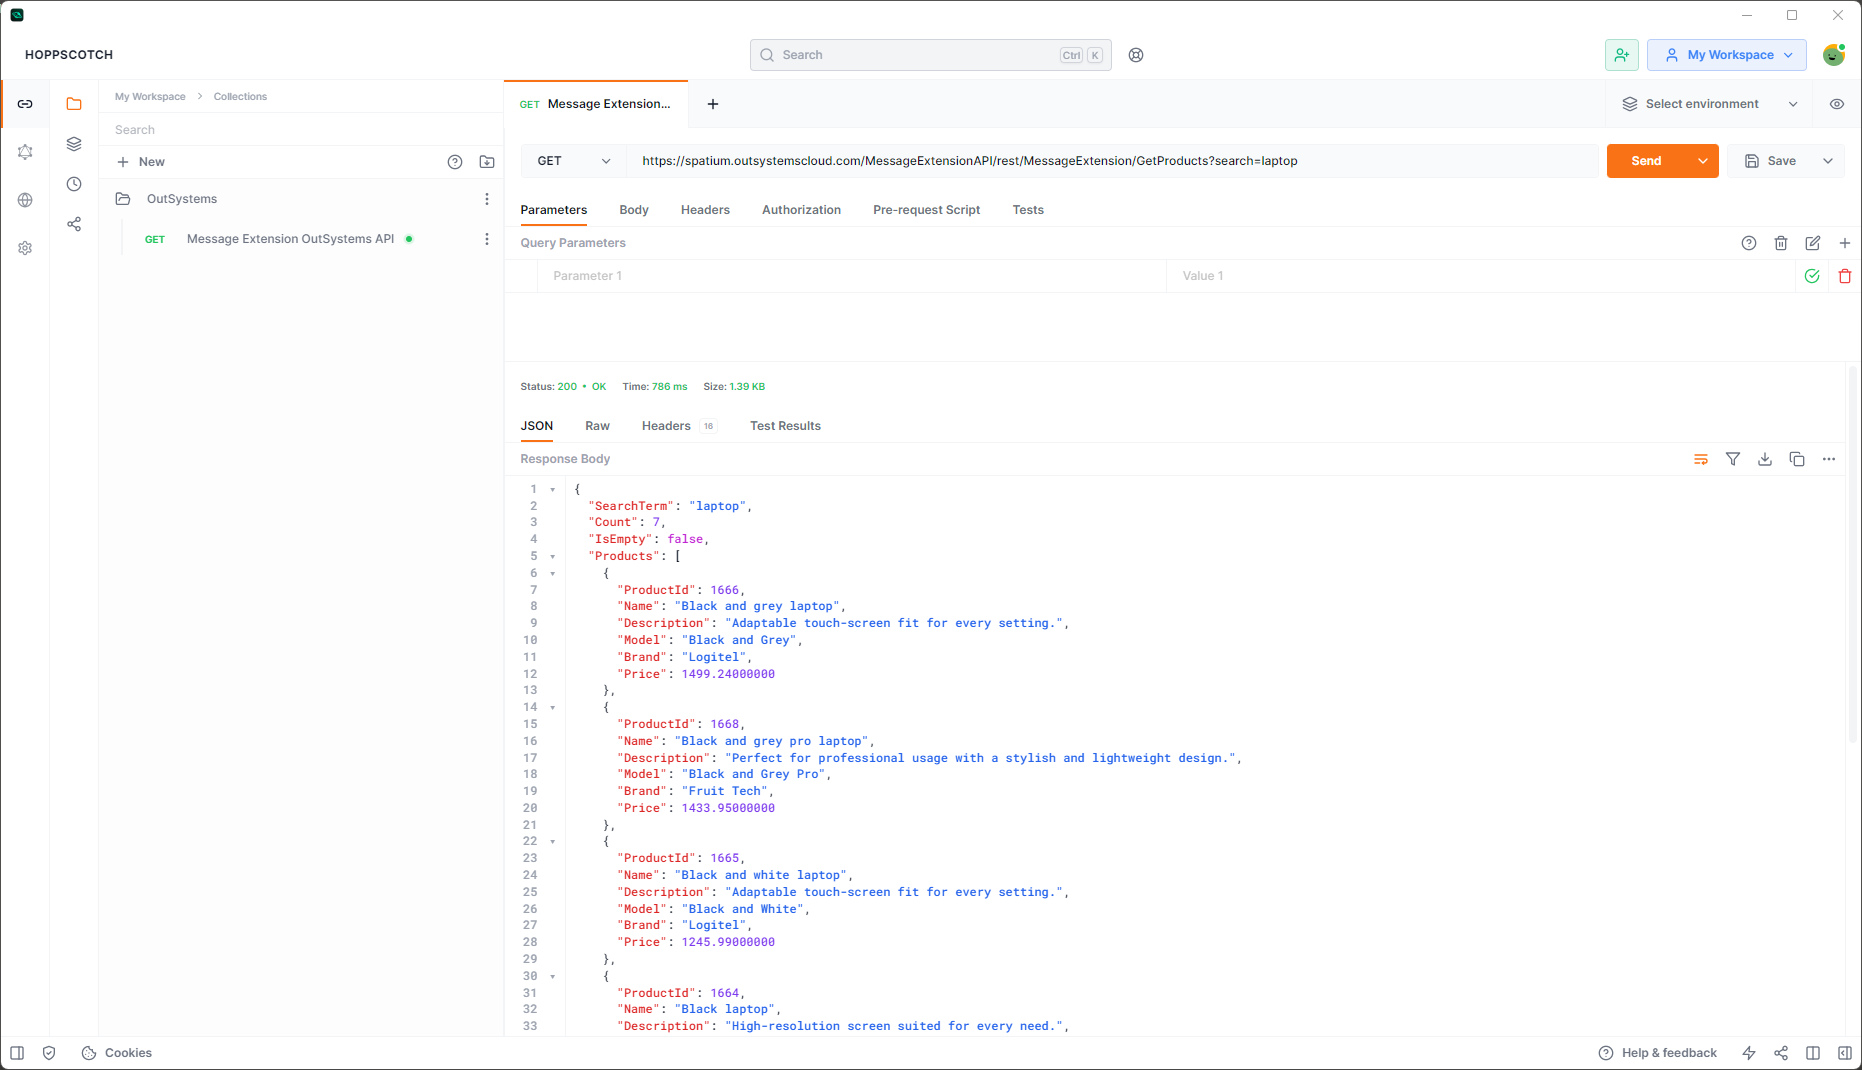
GetProducts has a single input parameter, SearchTerm, and a response that includes general attributes and a list of products. The flow within GetProducts should be self-explanatory. It conducts a "like" query against the sample data and simply returns the results.
Publish the component and try out your endpoint using Postman or Hoppscotch. If you haven't done any modifications the request url is https://<OutSystems Environment Base Url>/MessageExtensionAPI/rest/MessageExtension/GetProducts?search=<search term>
With the REST API endpoint working as expected, we can now proceed to create an OpenAPI Version 3 file.
OpenAPI Description File
As previously mentioned, the Microsoft Teams Developer Portal requires an OpenAPI Version 3 description file. Our exposed REST API already generates documentation, but this is a Version 2 Swagger file, which needs to be converted.
Right click on the MessageExtension REST API in Service Studio and select "Open Documenation" from the menu.
Click on the swagger.json link on top of the API documentation to open the specification in your browser
Copy the whole content
Go to editor.swagger.io
Clear the editor window ( File -> Clear Editor )
Paste the content of the swagger file to the editor window.
Under Edit select Convert OpenAPI 3
The original Swagger file, and thus the converted OpenAPI file, contains only a relative URL to our Message Extension API. We need to add the OutSystems environment base URL manually. Modify the following entry:
servers:
- url: https://<OutSystems Environment Base URL>/MessageExtensionAPI/rest/MessageExtension
- Save the OpenAPI 3 specification file locally. We will need it later when we create the Teams app in Microsoft Teams Developer Portal.
Response Template
Creating a response template is the only time when you need a text editor. A response template informs the Teams app how to display the data received from your API. Response templates are JSON documents, and the basic structure of a response template appears as follows:
{
  "version": "1.0",
  "jsonPath": "Products",
  "responseLayout": "list",
  "responseCardTemplate": { <your detail adaptive card template here> },
  "previewCardTemplate": { <your search result adaptive card template here> }
}
version - Version of the response template schema, always 1.0.
jsonPath - The path to the results in the JSON response. Our sample API returns an array of Products as search results, so we set the value to Products.
responseLayout - Defines the layout of the result items in the search preview. Specify list for text-based results and grid for image results.
previewCardTemplate - Either a Thumbnail card or a Hero card that determines how search results are displayed in the search window in Teams.
responseCardTemplate - An Adaptive Card used to render a single search result in the Teams channel.
Creating a previewCardTemplate is very simple as both Thumbnail and Hero cards have a fixed layout. Here is our template for the preview.
{
    "title": "${Name}",
    "subtitle": "${Brand} ${Model}",
    "text": "${Description}"
}
Take note of the ${xxx} placeholders. These correspond to the attribute names in the API response and are replaced with their respective values, similar to Handlebar templates. The document above represents a Thumbnail card. Thumbnail cards have additional attributes, which you can find in the documentation.
The responseCardTemplate is used to render the selected item from the result into a card that can be sent to a channel. These templates provide greater flexibility in designing the layout. Just like Thumbnail cards, you can use placeholders anywhere, which will be replaced with the corresponding data from your API. To design an Adaptive Card, you can use the Adaptive Card Designer, and you can find more information on Teams Adaptive Cards in the documentation.
For our Product result we will use the following Adaptive Card template
{
    "type": "AdaptiveCard",
    "$schema": "http://adaptivecards.io/schemas/adaptive-card.json",
    "version": "1.5",
    "body": [
      {
        "type": "TextBlock",
        "size": "medium",
        "weight": "bolder",
        "text": "${Name}"
      },
      {
        "type": "TextBlock",
        "text": "${Description}",
        "wrap": true
      },
      {
        "type": "FactSet",
        "facts": [
          {
            "title": "Model",
            "value": "${Model}"
          },
          {
            "title": "Brand",
            "value": "${Brand}"
          },
          {
            "title": "Price",
            "value": "${formatNumber(Price,2)}"
          }
        ]
      }
    ]
}
The full response template looks like this
{
  "version": "devPreview",
  "jsonPath": "Products",
  "responseLayout": "list",
  "responseCardTemplate": {
    "type": "AdaptiveCard",
    "$schema": "http://adaptivecards.io/schemas/adaptive-card.json",
    "version": "1.5",
    "body": [
      {
        "type": "TextBlock",
        "size": "medium",
        "weight": "bolder",
        "text": "${Name}"
      },
      {
        "type": "TextBlock",
        "text": "${Description}",
        "wrap": true
      },
      {
        "type": "FactSet",
        "facts": [
          {
            "title": "Model",
            "value": "${Model}"
          },
          {
            "title": "Brand",
            "value": "${Brand}"
          },
          {
            "title": "Price",
            "value": "${formatNumber(Price,2)}"
          }
        ]
      }
    ]
  },
  "previewCardTemplate": {
    "title": "${Name}",
    "subtitle": "${Brand} ${Model}",
    "text": "${Description}"
  }
}
Save the response template locally. We will need it in the next step when we create the Teams app in Microsoft Teams Developer Portal.
Microsoft Teams Developer Portal
In this final step we bring all things together in a new Teams App which we can try and later publish to our organization.
Developer Portal for Teams (previously known as App Studio) is the primary tool for configuring, distributing, and managing your Microsoft Teams apps. It is available under https://dev.teams.microsoft.com/. Permissions required. An alternative is to apply for the Microsoft 365 developer program to get a sandbox environment.
In Developer Portal select the Apps menu
Click on + New app
Enter a name for you app e.g. OutSystems Product Search and make sure that you select "Public developer preview (devPreview)" for the manifest version.
Submit the form
In the Basic Information screen you must fill out at the following minimum information
Full name
Short description
Long description
Developer or company name
Website (must be a valid HTTPS URL)
Privacy policy URL
Terms of use URL
Leave everything else as it is and click Save.
Next go to the App Features menu and click on the Message Extension button.
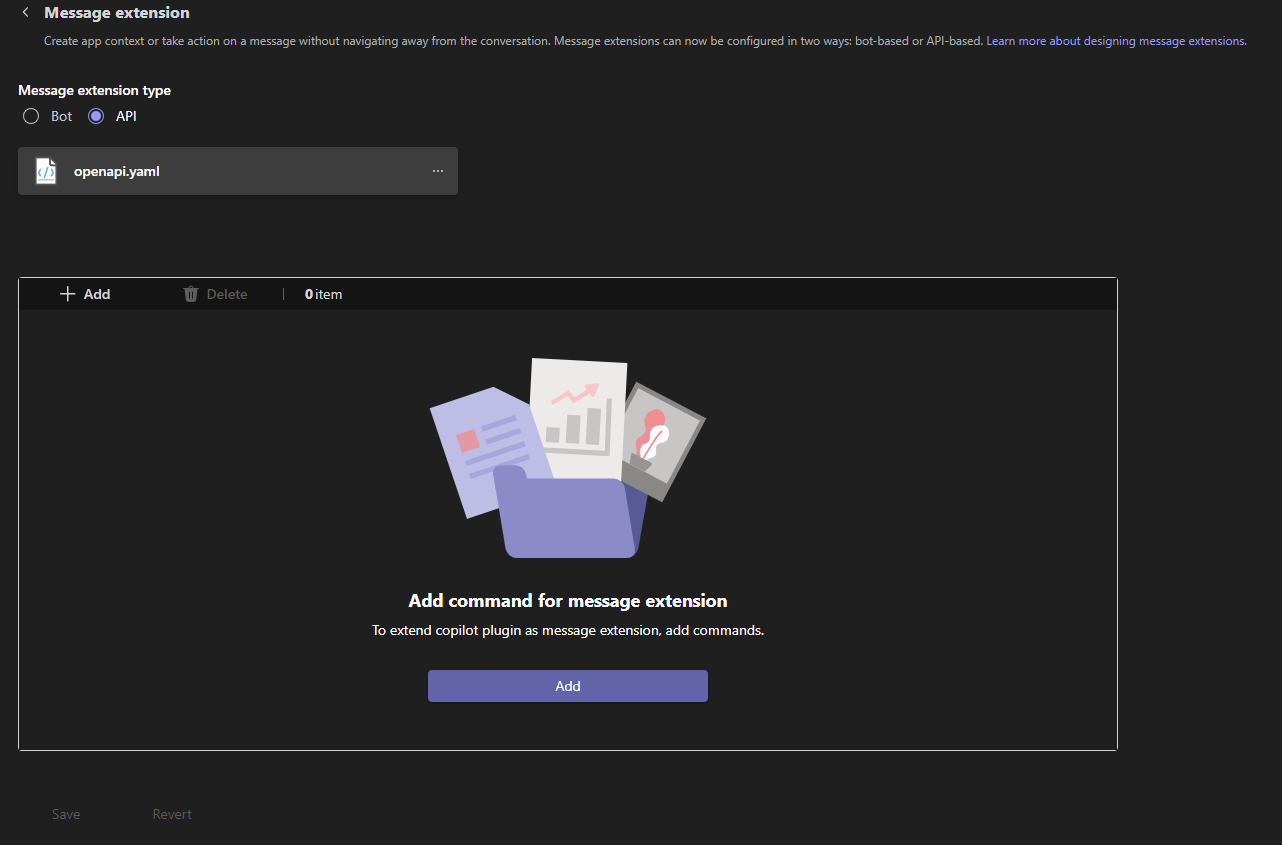
Select API for the Message Extension Type
Uploaded your OpenAPI Version 3 description file we created before.
Your screen should look like this
Click on Add and select the only available Endpoint from your API (GetProducts)
Upload your response template and fill in the missing required fields. If you followed allowed you only have to add the Command title.
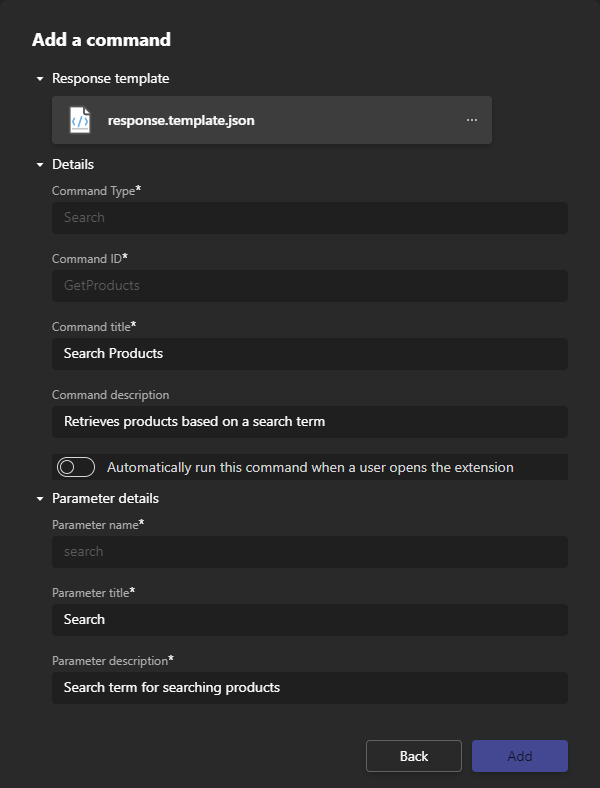
- Click Add to save
To finish the configuration click Save on the Message Extension page.
Before we proceed to test our new Teams app, let's validate the application. Click on Publish in the top right corner of the Developer Portal and select "Download package."
Visit Microsoft Teams - App Validator, upload the downloaded ZIP file, and review the validation results. If it succeeded move on to the next step.
Now you can preview your new app using the "Preview in Teams" button at the top of the Microsoft Teams Developer Portal. Make sure you are in a chat channel. If the app does not appear automatically, you can select it from the apps located below the chat input box.
Once you've validated your message extension, you can publish it to your organization's catalog.
Summary
Making data accessible from an OutSystems application for a search-based Teams Message Extension is quite straightforward. By using the Developer Portal for Teams, it can be accomplished without writing a single line of code.
As previously mentioned, this is not the end, as I have omitted the Authorization aspect in this article. Stay tuned for another article on how to add an authorization layer to your Message Extension API.
Thank you for reading. I hope you liked it and that i have explained the important parts well. Let me know if not 😊
If you have difficulties in getting up and running, please use the OutSystems Forum to get help. Suggestions on how to improve this article are very welcome. Send me a message via my OutSystems Profile or write a comment.