
Fine Grained Authorization in OutSystems with Amazon Verified Permissions
Use Amazon Verified Permissions in your OutSystems Factory for effortless Authorization Logic in your app.

Throughout my diverse career, I've accumulated a wealth of experience in various capacities, both technically and personally. The constant desire to create innovative software solutions led me to the world of Low-Code and the OutSystems platform. I remain captivated by how closely OutSystems aligns with traditional software development, offering a seamless experience devoid of limitations. While my managerial responsibilities primarily revolve around leading and inspiring my teams, my passion for solution development with OutSystems remains unwavering. My personal focus extends to integrating our solutions with leading technologies such as Amazon Web Services, Microsoft 365, Azure, and more. In 2023, I earned recognition as an OutSystems Most Valuable Professional, one of only 80 worldwide, and concurrently became an AWS Community Builder.
A couple of months ago, I had the chance to participate in a project where we implemented a front-end application on top of a document management system. The document management system used had a very sophisticated permission system, where you could set permissions for users and groups on a hierarchical level with inheritance, on an object level, and additionally based on specific metadata bound to an object. I then wondered how this could be done in OutSystems and experimented with building a central authorization system as a service application. After a while, I came to the conclusion that it was a huge effort to build it, and with a growing number of securables and especially hierarchical permission inheritance, it was no longer performant, so I stopped working on it. Later in the year, I noticed that Amazon released a new service called Amazon Verified Permissions, which seemed like a perfect solution for a fine-grained authorization system.
Amazon Verified Permissions
Verified Permissions is a policy-based authorization service. At a glance, it checks a principal's request to act (action) on a resource against one or more authorization policies.
Principal - A principal represents a role, user, service, or any other identity that can request to perform an action.
Action - For example a server or service action of your OutSystems application or service. In other words - an operation that is requested by a principal.
Resource - Something that can be accessed or modified by the specified action.
Policies are written in Cedar, a language specifically designed for defining permissions as policies. Originally developed by AWS, the Cedar specification and reference implementation is an Apache 2.0 open-source project. At the time of writing, Cedar has already been adopted by other vendors and open-source projects.
Cedar is easy to learn and simple to read, yet it still allows for the definition of complex role-based or attribute-based authorization models.
When and Why You Should Care
By default, the only built-in authorization method in OutSystems is application roles. User accounts can be associated either directly with roles or multiple roles can be assigned to user groups. Roles can then be used to protect screens, and you can use the predefined role actions in server actions to check if a user is associated with a specific role.
It becomes more challenging when you need finer-grained authorization control over resources, such as a record in one of your entities. The OutSystems documentation suggests implementing an ACL (Access Control List) based access system. However, this can lead to varying implementations in different applications and services, making maintenance and tracing of access rights more tedious - and may increase your Application Object count drastically.
Additionally, you must implement all aspects within your business logic. To track how a user gains access to a specific resource, you would need to examine your code. Even the slightest change to your authorization logic would require a code modification and redeployment.
Considering complex authorization logic, such as nested group structures, attribute-based conditions, or a combination of "allow" and "deny" access controls, there is a possibility that implementing the authorization logic may take longer to develop than the actual application itself. Additionally, you may experience a significant performance decrease due solely to authorization checks.
Using Amazon Verified Permissions or any other external authorization decision management solution can be extremely beneficial in this situation. It can considerably reduce the effort needed to create and maintain fine-grained authorization logic. Moreover, Amazon Verified Permissions and the Cedar policy are designed for rapid evaluation of access controls, thereby ensuring consistently high performance.
The Cedar Policy Language
Before exploring how to integrate Verified Permissions with OutSystems, let's take a closer look at the Cedar policy language.
Basic Policies
Below is a very simple policy. If a request satisfies the expression between the brackets the policy returns true, otherwise false. The example expression is satisfied when
The principal is an entity of type User and has an ID of 56 and
The requested action to perform is an entity of type Action with an ID of Edit and
The resource that is targeted by the action is an entity of type Case and has an ID of 155
The term entity describes the combination of a namespace (CaseManager), a type (e.g. User) and a unique identifier (e.g. 56).
permit(
  principal == CaseManager::User::"56",
  action in [CaseManager::Action::"Edit"],
  resource == CaseManager::Case::"155"
);
Policies can either permit or deny (forbid) a request, with deny policies taking precedence over permit policies.
The following example incorporates an extra condition:
permit(
  principal == CaseManager::User::"56",
  action in [CaseManager::Action::"Edit"],
  resource == CaseManager::Case::"155"
) unless {
  resource.IsSensitive == true
};
This policy evaluates as true unless the resource - an entity of type case with ID 155 - has the attribute "IsSensitive" set to true. Quite simple to understand, isn't it?
Let us see what a policy could look like to check if a principal belongs to a group.
permit(
  principal in CaseManager::Group::"Counsel",
  action,
  resource
);
Note the "in" operator following the principal. The "in" operator instructs Cedar to determine if the principal is a member of another entity's hierarchy. In our case, it refers to the entity of type Group with the ID "Counsel".
Both action and resource do not have a following operator which means any action on any resource.
Evaluation Data and Relations for Authorization Checks
But how does Cedar determine the hierarchy?
Well, we must inform Cedar about the relationships between these entities whenever we check authorization. Additionally, we need to provide any entities and essential entity attributes and their corresponding values required for policy evaluation.
Consider the following example Cedar policy
permit(
  principal in CaseManager::Group::"Counsel",
  action in [CaseManager::Action::"Edit"],
  resource == CaseManager::Case::"155"
) unless {
  resource.IsSensitive == true
};
In our scenario, a user with an ID of 25 is a member of the Counsel Group, and we want to determine if that user is permitted to edit Case 155. As mentioned earlier, we need to provide all relevant data and relationships to Verified Permissions, which are necessary for evaluating one or more applicable policies. Here we would pass to the IsAuthorized operation:
principal set to CaseManager::User::"25", which is our User entity.
action set to CaseManager::Action::"Edit"
resource set to CaseManager::Case::"155"
In addition, we need to provide two additional information
for the User entity we have to define a parent relation with the CaseManager::Group::"Counsel" entity
for the Case entity we have to add an attribute IsSensitive set to false (to satisfy the policy condition)
Strict Mode with Schema
The next question we address is: what happens if you fail to provide additional data that is crucial for authorization checks? Imagine having thousands of policies created using various entity attributes for conditional checks, and you want to ensure that those attributes are always present during an authorization check.
Although not mandatory, you can set a Policy Store in Amazon Verified Permission to Strict mode and establish a Schema.
The Schema defines all valid entities, entity relations, and attributes. Applying a schema ensures that:
1. You can only create a policy using entities and attributes defined in your schema, thus preventing the creation of policies that would never apply due to missing data.
2. Authorization checks include all essential data necessary to determine applicable policies and perform policy evaluation.
Template Linked Policies
Let's say you created thousands of policies for a specific principal-action-resource combination individually and now you have a requirement to change or add an attribute condition. In that case, you would have to iterate over all those policies and change them one by one. Furthermore, it is sometimes not that easy to identify all applicable policies that need to be changed.
Fortunately, Amazon Verified Permissions offers the ability to create Policy templates and then generate policies linked to a specific template. If you need to change a condition, you can simply modify the template, which will immediately impact all policies associated with that template.
permit(
  principal in CaseManager::Group::"Clerk",
  action in [CaseManager::Action::"Edit",CaseManager::Action::"View"],
  resource == ?resource
) unless {
  resource.IsSensitive == true
};
Above is a sample template. principal and action are static while resource is compared with ?resource. The question mark in front indicates that this parameter must be given when creating a policy based on this template.
Now if you want to change the condition resource.IsSensitive later on to compare with false then all bound policies would be changed at once.
More on Cedar and Amazon Verified Permissions
In this section, we just tipped the iceberg. I recommend reading the following articles and documentation before you proceed
Authorization and Cedar: A New Way to Manage - Tutorial Series by Daniel Aniszkiewicz
Preparations
Now that you have a basic understanding of Cedar and Amazon Verified Permissions, we can begin exploring how to integrate with OutSystems. Let's start by tackling some preparatory tasks.
Create and Configure AVP Policy Store - Create an Amazon Verified Permissions (AVP) Policy Store, import a schema, and establish baseline policies and policy templates.
Create IAM Policy and User - Create an IAM User with programmatic access and an associated policy that grants access to Amazon Verified Permissions operations. This account will be used for interacting with AVP from OutSystems.
Download and install Forge components - Install the AVP Forge component and the accompanying demo application for this article.
Add a Group to OutSystems User Provider - Create Group in the OutSystems User Provider and assign user accounts.
Configure Demo application - Configure site properties of the Demo application.
Create and Configure AVP Policy Store
Go to the AWS console and log in. Make sure that your preferred region is selected.
In the Search box search for Amazon Verified Permissions and browse to the service.
Click on "View Policy Stores" and then "Create new policy store".
Select "Empty policy store" from the options then click on "Create policy store"
After successful creation copy the value on the left under "Current policy store". We will need this Policy Store Identifier later.
In the menu on the left select "Schema", then click on "Create schema"
Switch to JSON mode and paste the following schema, replacing the current JSON. Then click "Save changes".
{
    "CaseManager": {
        "entityTypes": {
            "Case": {
                "shape": {
                    "type": "Record",
                    "attributes": {
                        "AssignedTo": {
                            "name": "User",
                            "required": true,
                            "type": "Entity"
                        },
                        "IsSensitive": {
                            "required": true,
                            "type": "Boolean"
                        }
                    }
                },
                "memberOfTypes": []
            },
            "Application": {
                "shape": {
                    "attributes": {},
                    "type": "Record"
                },
                "memberOfTypes": []
            },
            "Group": {
                "shape": {
                    "attributes": {},
                    "type": "Record"
                },
                "memberOfTypes": []
            },
            "User": {
                "shape": {
                    "attributes": {},
                    "type": "Record"
                },
                "memberOfTypes": [
                    "Group"
                ]
            }
        },
        "actions": {
            "AddCase": {
                "memberOf": [],
                "appliesTo": {
                    "principalTypes": [
                        "User"
                    ],
                    "resourceTypes": [
                        "Application"
                    ],
                    "context": {
                        "type": "Record",
                        "attributes": {}
                    }
                }
            },
            "GetCase": {
                "memberOf": [],
                "appliesTo": {
                    "resourceTypes": [
                        "Case"
                    ],
                    "context": {
                        "type": "Record",
                        "attributes": {}
                    },
                    "principalTypes": [
                        "User"
                    ]
                }
            },
            "AssignCase": {
                "memberOf": [],
                "appliesTo": {
                    "context": {
                        "type": "Record",
                        "attributes": {}
                    },
                    "resourceTypes": [
                        "Case"
                    ],
                    "principalTypes": [
                        "User"
                    ]
                }
            },
            "ToggleSensitivity": {
                "appliesTo": {
                    "context": {
                        "attributes": {},
                        "type": "Record"
                    },
                    "principalTypes": [
                        "User"
                    ],
                    "resourceTypes": [
                        "Case"
                    ]
                },
                "memberOf": []
            },
            "DeleteCase": {
                "appliesTo": {
                    "resourceTypes": [
                        "Case"
                    ],
                    "principalTypes": [
                        "User"
                    ],
                    "context": {
                        "attributes": {},
                        "type": "Record"
                    }
                },
                "memberOf": []
            },
            "UpdateCase": {
                "appliesTo": {
                    "resourceTypes": [
                        "Case"
                    ],
                    "principalTypes": [
                        "User"
                    ],
                    "context": {
                        "type": "Record",
                        "attributes": {}
                    }
                },
                "memberOf": []
            }
        }
    }
}
In the menu on the left select "Policy templates", then click "Create policy template"
Enter "Case Viewers" as Description.
Copy the following policy expression to "Policy Statement", then click on "Create policy template". Name the policy "Case Viewer Template". Copy the Policy Template ID which we will need later.
permit(
  principal == ?principal,
  action in [CaseManager::Action::"GetCase"],
  resource == ?resource
) unless {
  resource.IsSensitive == true
};
In the menu on the left select "Policies"
Create the following Static Policies (skip the visual assistant and copy the policy expression directly)
Case Managers can create cases
permit(
  principal in CaseManager::Group::"os-case-manager",
  action in [CaseManager::Action::"AddCase"],
  resource == CaseManager::Application::"CaseManager"
);
Case Managers can perform any case action
permit(
  principal in CaseManager::Group::"os-case-manager",
  action in [CaseManager::Action::"GetCase",CaseManager::Action::"UpdateCase",CaseManager::Action::"DeleteCase",CaseManager::Action::"AssignCase",CaseManager::Action::"ToggleSensitivity"],
  resource
);
Assignee can read and update an assigned case
permit(
  principal,
  action in [CaseManager::Action::"GetCase",CaseManager::Action::"UpdateCase"],
  resource
) when {
  resource.IsSensitive == false && resource.AssignedTo == principal
};
Create IAM Policy and User
Next, we need an IAM user with programmatic access and an associated policy that grants specific permissions to the created Policy Store.
In the AWS console switch to Identity and Access Management Service (IAM).
In the menu on the left select Policies and click on "Create policy"
Switch to JSON edit mode and copy the following Permission Definition. Make sure to change the placeholders for "<AWSAccount>" and "<PolicyStoreId>" to your AWS Account ID and the ID of the Policy Store you created.
{
    "Version": "2012-10-17",
    "Statement": [
        {
            "Sid": "VisualEditor0",
            "Effect": "Allow",
            "Action": [
                "verifiedpermissions:DeletePolicy",
                "verifiedpermissions:CreatePolicy",
                "verifiedpermissions:ListPolicies",
                "verifiedpermissions:IsAuthorized",
                "verifiedpermissions:GetPolicy"
            ],
            "Resource": "arn:aws:verifiedpermissions::<AWSAccount>:policy-store/<PolicyStoreId>
        }
    ]
}
Complete the Policy creation.
In the Users menu create a new user and attach the created policy directly.
In the details page of the created user in the "Security credentials" tab generate a new access key pair.
Make sure to copy both the "Access Key" and "Secret Access Key". We will need both later.
Download and install Forge components
Download and install "AWS Verified Permissions" from OutSystems Forge - This is the connector component.
Attached to the connector, there is also a Demo Application. Download this too, as we will use it to examine some implementation specifics.
Add a Group to OutSystems User Provider
Open the Users Provider Frontend in your environment (https://<youroutsystemsenvironment>/Users)
Add a new group with the exact name "os-case-manager". The name is used as an identifier in some policies you imported earlier. Add at least one user to this group. Members of this group have full permissions.
Configure Demo application
In Service Center (https://youroutsystemsenvironment>/servicecenter) open the VerifiedPermissionsAuthService_IS module.
In Site Properties set the values for AWSAccessKey, AWSSecretAccessKey, AWSRegion and AVPPolicyStoreId to match your IAM User and Policy Store Identifier.
Next, go to the VerifiedPermissionsDemo module and set the site property AVPPolicyStoreId to the policy store identifier you copied above. Set the AVPViewerTemplateId to the Policy Template ID you created above.
Now that all preparatory tasks are completed, you are ready to test the sample application.
Demo Application Overview
The demo application is very simple. It allows a member of the os-case-manager group to create a case with a title and a description. Cases can be assigned to any user account and an assigned user can view the details and update the details. The first assigned user is the creator of the case.
Modules
The Demo Application consists of two modules
VerifiedPermissionsDemo - The actual web application
VerifiedPermissionsAuthService_IS - This module is designed to serve as a central authorization service. In a real OutSystems Factory, it should function as a central service that provides Service Actions for all other applications.
Permissions
There are some basic permissions represented by the static policies you created.
Case Managers can create cases
This policy allows members of the os-case-manager group to add a new case to the application.
Case Managers can perform any case action
This policy allows members of the os-case-manager group to perform all case-related actions.
GetCase - Retrieve the details of a case
UpdateCase - Update the details of a case
DeleteCase - Permanently delete a case
AssignCase - Assign a case to a user or add or remove a viewer of a case
ToggleSensitivity - Switch case to Sensitive and back
Assignee can read and update an assigned case
A user that is assigned to a case can perform the following actions
GetCase - Retrieve the details of a case
UpdateCase - Update the details of a case
However, if the case is marked as sensitive, even the assignee cannot access or edit the case details.
Case Viewer Template
In addition, policies are created at runtime whenever a member of the os-case-manager groups adds another viewer to a case. Those policies are created using the Policy Template "Case Viewer Template" you created which grants the following permission
- GetCase - Retrieve the details of a case
However, similar to the assignee permission, this applies only if the case is not sensitive.
Try out
Before delving into the technical implementation details, it is recommended that you explore the demo application. Alter group memberships and experiment with various user accounts to observe how these changes impact specific actions and the error messages you may encounter.
Implementation Details
In this article, I will walk you through the most important implementation steps related to authorization.
- Open both modules of the demo application in Service Studio (VerifiedPermissionsDemo and VerifiedPermissionsAuthService_IS)
Authorization Service
We'll begin by examining the VerifiedPermissionsAuthService_IS module. As previously mentioned, this service module is intended to function as a central authorization service, which means it can be utilized across multiple applications.
The module exposes four actions (exposed as service actions)
CheckAuthorization - Used to check if a user has permission to act on a resource
CreatePolicyFromTemplate - Used to create a new policy based on a policy template. In the demo, this action is used whenever a new viewer gets added to a case
DeletePolicy - Used to delete a policy. In the demo, this action is used when a viewer is removed from a case.
ListTemplateLinkedPolicies - Used to discover all policies affecting a principal or a resource or both
Open the CheckAuthorizationAction server action.
This action flow
Builds the user entity hierarchy by retrieving all group memberships for the given user. It returns an entity for the user along with the parent group identifiers. With this entity, AVP can evaluate group memberships. GetUserEntityItem
This entity along with all other entities given as input parameters is then used to perform the authorization check against AVP policies.
Next, open the ListTemplateLinkedPoliciesAction server action
This action is used whenever we need to determine which policies affect a given principal or resource. In the demo, this action is used to determine the current allowed viewers of a case.
Next, open the CreatePolicyFromTemplateAction
This one is pretty easy. It takes a template identifier and principal and creates a template-linked policy.
Lastly, open the DeletePolicyAction
This action deletes a policy using the given policy identifier.
Case Manager
Switch to the VerifiedPermissionsDemo. In the logic tab review the server actions in the Business_Logic folder.
Each action here relates to a task a user can perform on the UI and each of it contains an authorization check before processing the request.
The application has two general types of authorization check
On the application level using the CheckApplicationAuthorization server action
On the case level using the CheckCaseAuthorization action
The only difference between the two is, that in the later case, the database is queried for the case details and an AVP entity is created using the CaseToEntityItem server action and added to the input parameters of the CheckAuthorizationOperation.
Both actions take an Action as input which is an entity identified by its namespace e.g. "CaseManager::Action" and its identifier e.g. "GetCase".
I guess most of the business logic is easy to read, so I will not get into details. But there is one server action we should take a closer look.
Open the CaseManager_GetViewers server action.
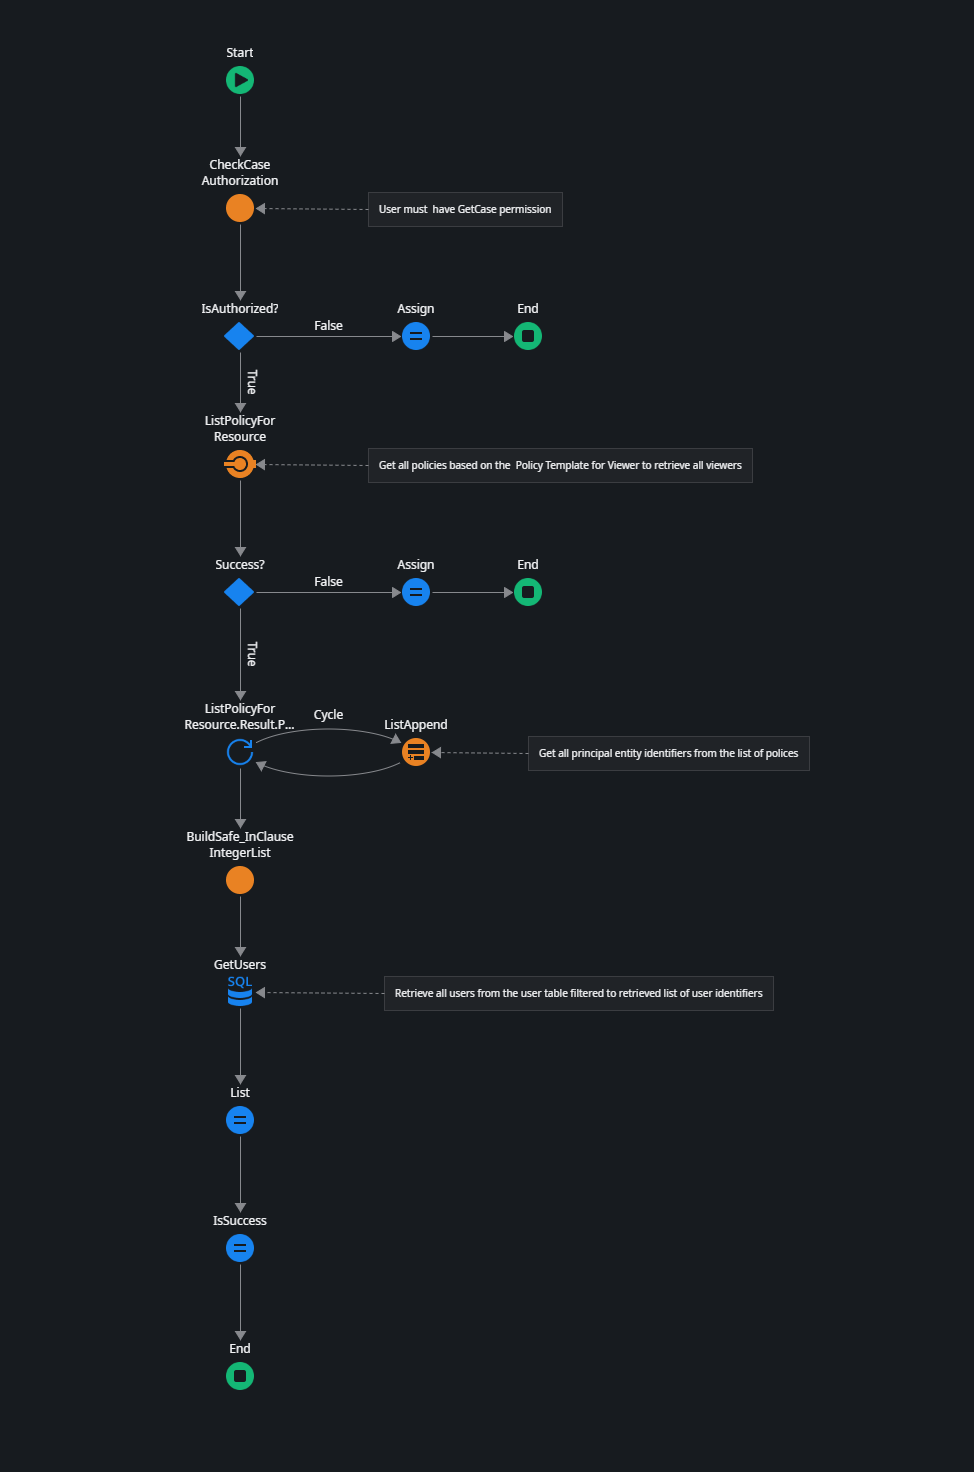
This server action uses the ListTemplateLinkedPolices service action of the VerifiedPermissionsAuthService_IS module to retrieve all applicable policies for the given case.
It then cycles through the policies to get all principal identifiers and builds a list of retrieved user identifiers.
Lastly, it performs an advanced SQL statement with an IN clause to retrieve all viewer user accounts.
And that's it. I hope you don't mind that I didn't go into every detail of the implementation. I believe that most parts are pretty much self-explaining. Let me know if you have any difficulties.
Summary
AVP and Cedar can be a great addition to your OutSystems factory or even just to a single application. It can drastically reduce the efforts of building complex authorization logic. But AVP does not only have advantages. Personally, I am missing
The ability to send bulk authorization requests which would be very helpful to check a principal's permission to entries of a list of records.
The ability to retrieve a list of actions a principal can perform on a resource.
By the time of writing Amazon Verified Permissions is still brand-new, so we can expect some nice additions in the future.
Thank you for reading. I hope you liked it and that i have explained the important parts well. Let me know if not 😊
If you have difficulties in getting up and running, please use the OutSystems Forum to get help. Suggestions on how to improve this article are very welcome. Send me a message via my OutSystems Profile or write a comment.